Looking to perfect your still-life drawing game? This easy Procreate tutorial is here to help! Read along for a simple yet comprehensive step-by-step guide on how to draw strawberries digitally using iPad Pro.
Digital drawing continues to thrive as an exciting medium in the world of art. Many famous illustrators have created truly remarkable work using Procreate on iPad Pro, and now it’s your turn to try out the amazing tools this artistic medium has to offer.
This realistic strawberry drawing Procreate tutorial will break down the process of illustrating on a tablet and set you up with the basics of this amazing app. We’ll use how to draw strawberries as our example!
How to Draw Strawberries: Drawing on iPad
I’m a Toronto illustrator who specializes in book illustration, portraiture, editorial illustration and exhibition design. Over the last few years the digital medium has become an important drawing tool for me and a integral part of my illustration process overall.
If you are new to digital drawing I am sure you’ll be amazed, both by how easy it is to pick it up, and by the new range of drawing potential it provides. Creating illustrations of everyday things around your home, like a strawberry, with an Apple Pencil on iPad Pro, allows for new and advantageous ways of creating layers, texture, and dimension, and is also really quite fun.

Sketch Realistic Strawberries At Home
One of the best ways to become an expert on how to draw strawberries is by visiting your local farmers market or the produce section of the grocery store.
Strawberries are widely appreciated for their characteristic aroma, bright red color, juicy texture, and sweetness. They can be enjoyed on their own as a healthy snack or in such prepared foods as jam, juice, pies, ice cream, milkshakes, and chocolates. Artificial strawberry flavorings and aromas are also widely used in products such as candy, soap, lip gloss, and perfume.
The garden strawberry was first bred in Brittany, France, in the 1750s. Today, world production of strawberries averages 9 million tonnes, led by china with 40% of the total.
Purchase a variety of shapes and sizes as it helps make a still life fruit drawing more interesting. Be sure to arrange the strawberries on your kitchen counter to photograph in ample natural light.
Once you’ve finished drawing strawberries be sure to eat them up! We know you’ll love these popular strawberry recipes at home:
- Jordgubbstårta Gluten Free Swedish Strawberry Meringue Cake
- Rhubarb Muffins with Strawberry Cream Cheese
- Spiced Poached & Stewed Strawberry Compote
- Strawberry Cream Cheese Muffins
- Rhubarb Strawberry Dutch Baby German Pancakes
- Korean Strawberry Milk
- Fresh Strawberry Mojito Cocktail
- Summer Strawberry Negroni Cocktail
Strawberry Drawing Procreate Tutorial
The strawberry is a classic. North America’s favourite yogurt flavour. Favourite jam variety. The taste of red. These ruby gems are a ubiquitous food enjoyed worldwide.
Strawberries also make a great subject of still-life drawing. Their colour is deep, and undulating. Their bright green leaves compliment their crimson tones. And their unique seed structure provides pattern and detail. Rendering a strawberry is excellent practice in detailed observation.
Luckily for you Procreate makes recreating telltale strawberry features in your drawing fun and easy. And this Procreate tutorial will break down the process into separate steps that will have you creating a still life strawberry masterpiece in no time.
Not to mention, the Procreate methods you’ll practice using in this tutorial will create the benefit of adding many exciting new tools to your art arsenal!
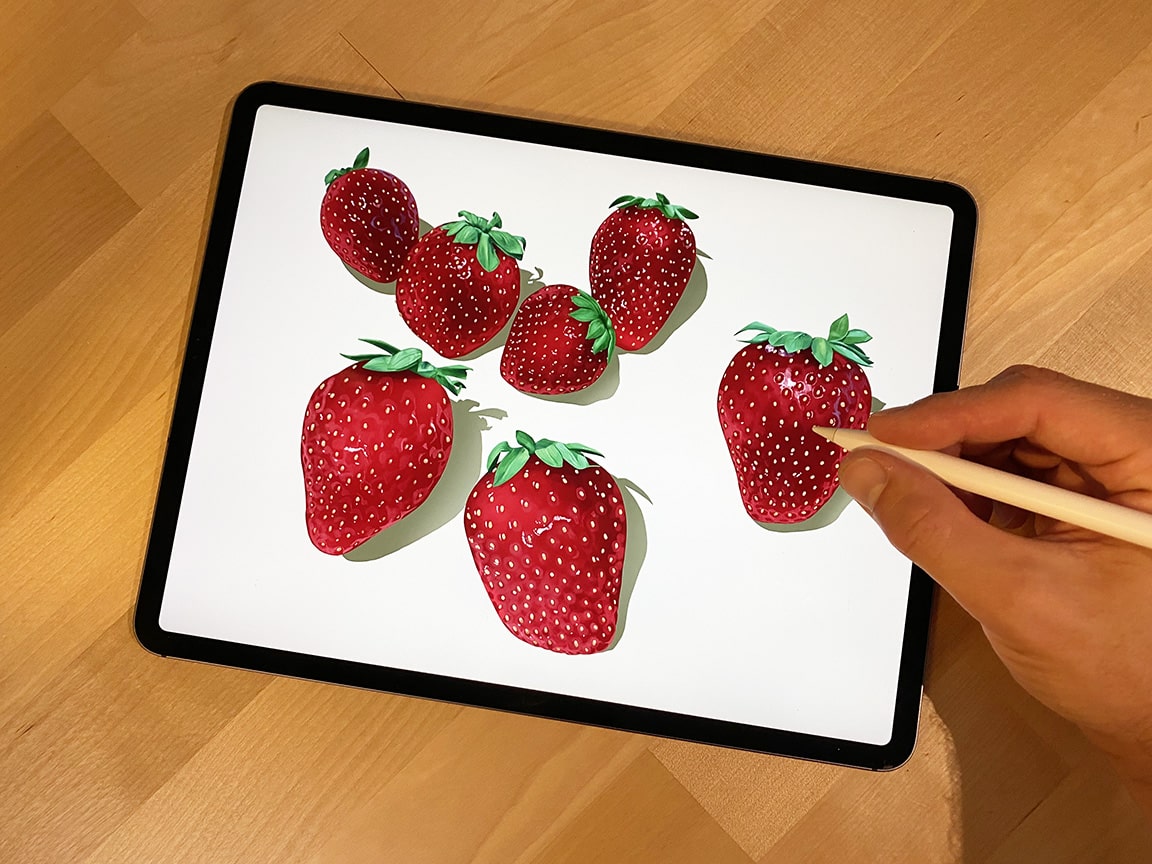
Procreate Tutorial: How to Draw Strawberries with iPad Pro
Let’s first get set up with a new canvas in Procreate. When you first open the app you’ll be in the “gallery” where all of your artworks will be visible. Tap the “+” in the top right of the screen and a menu will appear where you can select your canvas size.
To choose your dimensions click “create custom canvas” and enter them (in mm, cm, inches, or pixels). You can simply select “screen size,” however I recommend going bigger so that you have the option to print your finished piece with a nice resolution.
For my strawberry drawing I’ve created an 11″ x 14.5″ canvas. I’ve gone with a resolution of 300 DPI, which allows for up to 35 layers. If you go too big the maximum number of layers you can have in your artwork can be too few for our purposes, this is a good size.
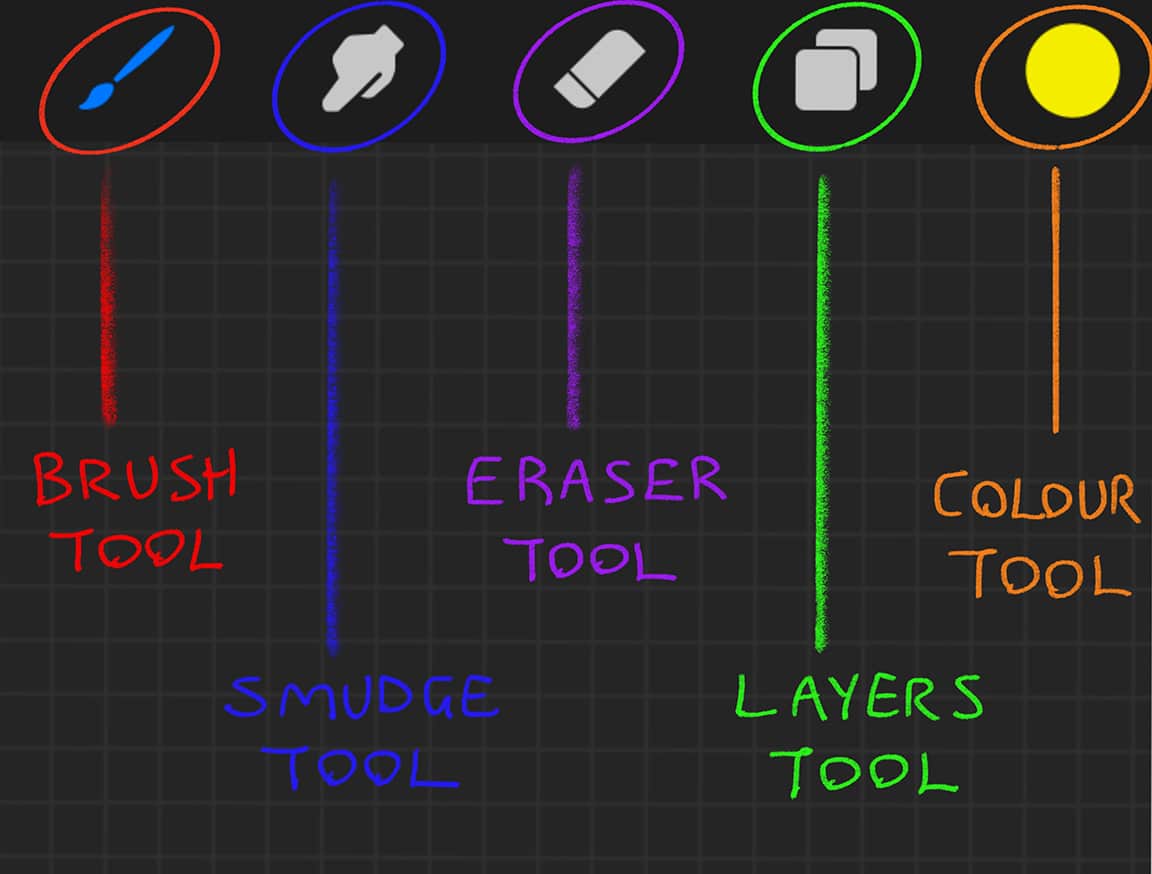
Now it’s important to explore and familiarize yourself with Procreate’s basic tools. Starting with the toolbar on the top right of your canvas.
- The Brush Tool: This is the tool with which you draw/paint. Tap it to open your Brush Library. Procreate’s brushes are categorized in a list down the left side of the drop down menu. Tap any of these to see your brush options in each category. Choose what you like and then tap the brush icon in the toolbar again to close the menu. Now get scribbling! Try a few different brushes and use different pressures and angles of the Apple Pencil – it’s remarkably realistic in its response to your hand.
- The Eraser Tool: It does exactly what you think it does! Tap it and you’ll open an identical Brush Library as tapping the brush tool. Try a few and see how it erases your scribbles.
- The Colour Tool: This is your colour palette. Tap and it will open in its default view of “Disc.” Use the outer wheel to select colour, and the inner circle to select lightness/darkness. Or you can use the square view that combines the two. When you’ve chosen the colour you want to use, tap the colour icon in the toolbar again to close the menu. Again, do some scribbling! Choose a variety of brush and colour combinations to get a feel for the colouring process.
- The Smudge Tool: This is used to blend colours and create gradients. This tool has the same effect as taking your finger to pencil on paper and rubbing it to blend. The smudge tool mimics the real thing fairly well but it does take some getting used to.
- The Layers Tool: You can use this menu to create multiple layers on your canvas, and select between them. How to do this, and the benefits of layers, will be best understood by following through my own example here in this Procreate tutorial.

Then there are the slider toolbars on the left side of your canvas.
- Brush Size: The top slider. Tap, hold and move up and down to adjust the size of your brush tip. A preview window will open up to help guide you. This slider is used for your brush, smudge and eraser tools in the same way.
- Brush Opacity: The bottom slider. This works the same way as the brush size slider, but is for brush opacity.
- Undo/Redo: Under the sliders you’ll see these two buttons. Tapping the undo button will undo the last stroke you drew/erased. Vice versa with the redo button. This is a very useful tool you’ll probably use a lot. You can also undo by tapping once anywhere on your canvas with two fingers.
There is also the toolbar in the top left of your canvas. For these tools I will point them out and explain them along the way as we need them.

How to Draw Strawberries Step One: Choosing a Reference Photo
If you can take your reference photo yourself, great. You can use the iPad itself to capture a good photo.
If you don’t have any strawberries handy, there are plenty of images online for you to choose from. It’s a good idea to chose one that is copyright free and there are several websites that have large libraries of free images.
I took my reference image myself in my kitchen. I was lucky enough to pick up a delightful little box of strawberries from Ile d’Orleans, a region in the Quebec City area that is famous for its strawberry farms. I arranged a few of the prettiest berries on my counter for a photo shoot (and then promptly ate the rest).
I made sure to select a bunch that showed a nice variety of size and shape, and made sure that some light reflected off the skin to emphasize their unique kind of shininess.

The first thing to do before you get to drawing is setting up your reference photo to work from. A great option with iPad Pro is that you can keep your photo open in a window beside your Procreate canvas while you work.
To do so, tap and hold the bar at the bottom centre of the screen in Procreate, then slowly pull up the iPad menu (if you swipe too quickly you’ll close Procreate).
Once the menu is up, tap and hold the photos icon, and drag it to the left side of the screen (or right side, for the lefties out there!) Pull it past the edge of the Procreate window and drop it there and tada, you have both open at the same time. You can also adjust the size of the photo window by holding and sliding the side bar of the window.
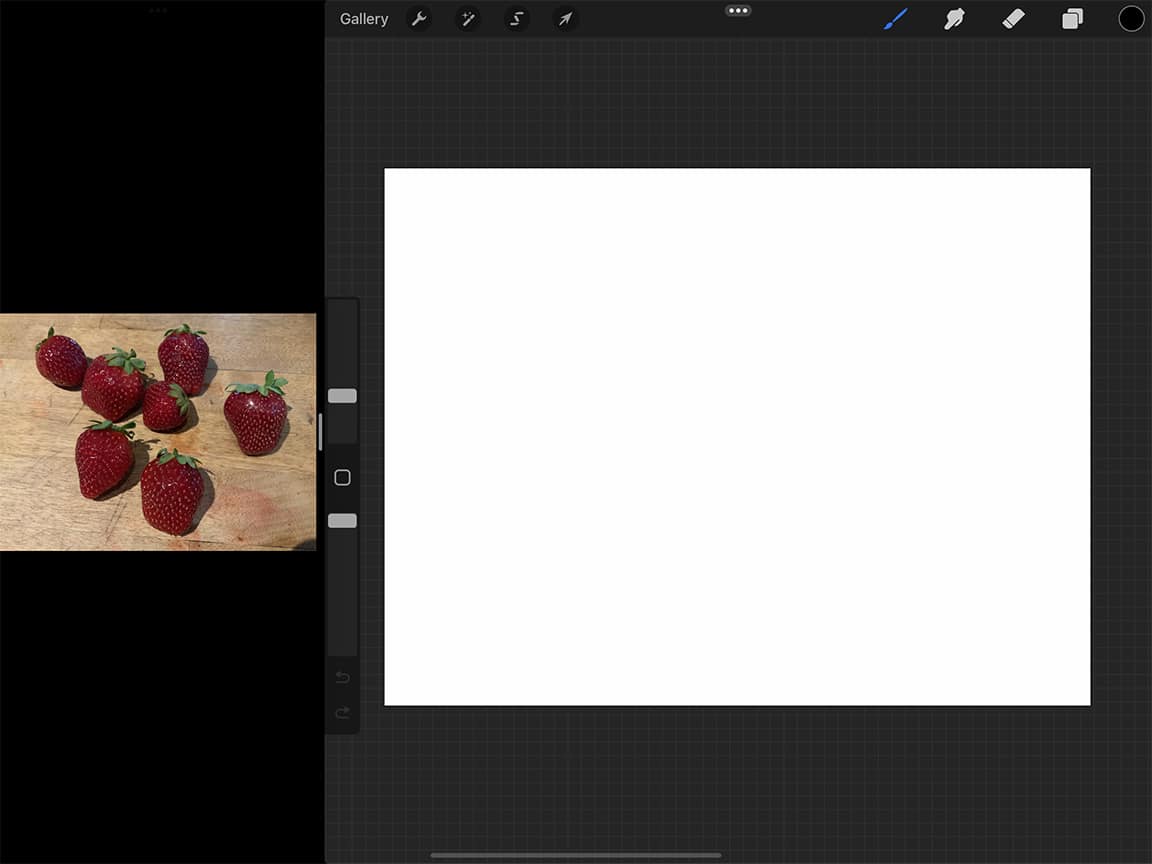
How to Draw Strawberries Step Two: Blocking Your Shapes
Now you are set up to start drawing strawberries!
The first step will be blocking out the shapes of the individual strawberries with a solid colour. For this I used the studio pen brush under “inking” in the brush menu, because it gives a nice clean line.
To determine which colour to use, I took a look at my strawberry reference photo and tried to match it generally to the medium colour tone of the berries. The great thing about drawing fruit is that it is naturally imperfect, so you don’t have to be completely tidy with your shapes.
Once you have a fully enclosed shape, you can fill it in with solid colour by tapping and holding the colour icon in the top right, and then dragging it to the inside of your shape and releasing. The shape will then fill with that colour. Make sure your shape is fully enclosed or the “fill” will fill the entire canvas. If this happens just tap your canvas with 2 fingers to “undo.”
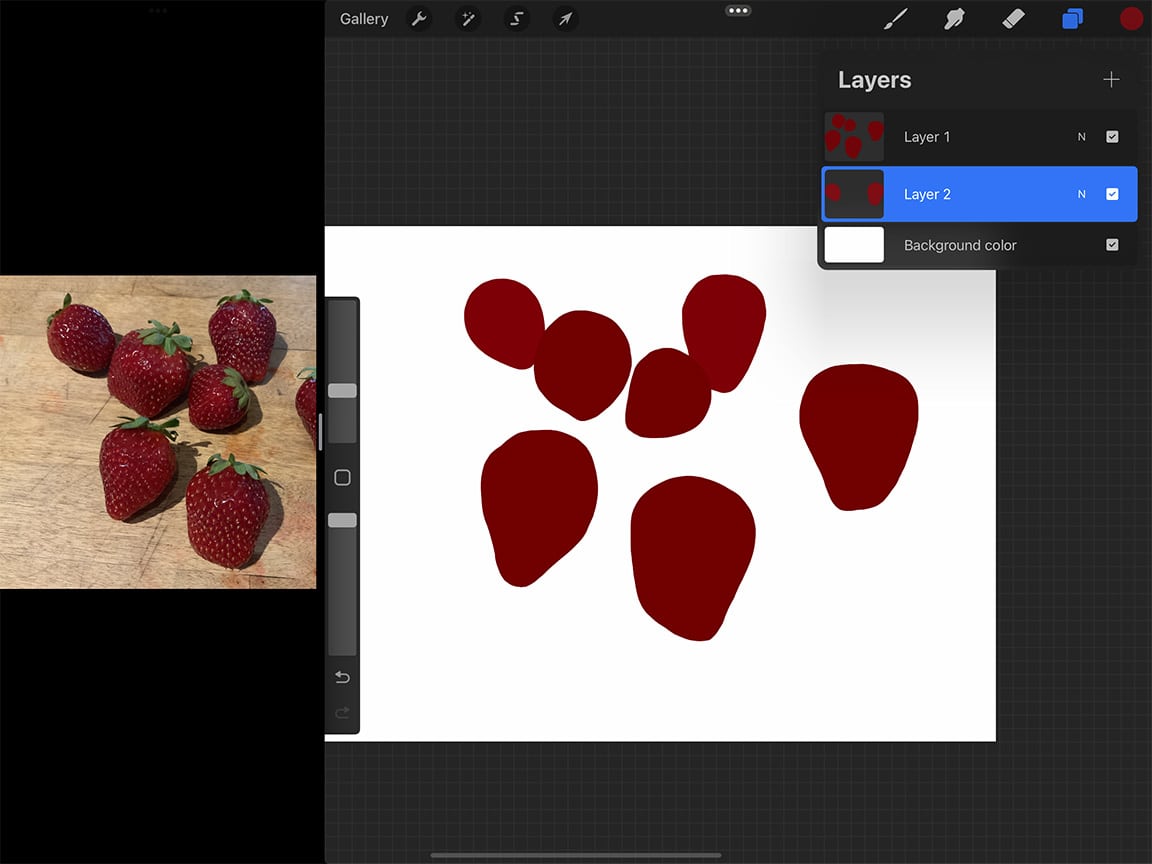
You may find it helpful to separate these shapes onto separate layers. For my drawing, anytime a strawberry was touching another I would try to make sure they were on separate layers. I ended up being able to do so with two layers. This will make painting and editing them much easier down the road because you won’t have to worry about your painting bleeding from one strawberry to another.
I did my layers in slightly different shades of red, just so that I could keep my layers straight at a glance.
To create a new layer tap the “layers” icon in the top right menu, and then tap the “+” in the drop down. You can tap and hold any layer in the menu and drag it above or below other layers.
You can adjust the size and position of different elements in your blocked shapes by utilizing the “lasso” tool. That is the tool in the top left menu that looks like the letter “S”. Tap it, and then make sure “freehand” is highlighted in the bottom menu. Then you can use your Apple Pencil to draw around the part you want to adjust.

One you’ve traced around that portion, tap the cursor tool in the top left menu and you’ll see a bounding box appear which you can use to make adjustments. For example, I adjusted the size or orientation/placement of my strawberries after the fact.
How to Draw Strawberries Step Three: Underlying Gradients
Now that you have your base layers of colour you can start “painting” and adding layers of colour to build up the 3-dimensionality and shape of your strawberries. Take a good look at your reference photo and try to see the underlying gradients of light and dark tones beneath all of the finer details.
Before you begin though, Procreate has a feature that makes this painting and blending part a lot easier, called the alpha lock. If you “alpha lock” a layer, you can only paint on what already exists on that layer. Meaning when blending out some colours you don’t need to worry about your smudges coming past the edges of you blocked out shape.

To alpha lock a layer, open the layers menu. Using two fingers, swipe the layer you want to lock to the right. If you’ve done it successfully the layer thumbnail will get a checkered background. To un-lock the layer at any point simply swipe it with two fingers to the right again.
Now you can get to painting. For my drawing I started and completed one strawberry first before moving on to the rest.
For this part you do not necessarily need to be very tidy with your painting. You can roughly paint out lighter and darker areas and then blend and smooth them out using the smudge tool.
For this part I chose the “gouache” brush under “painting” in the brush menu, but feel free to use whichever brush suits you.

How to Draw Strawberries Step Four: Seeds
After you have your smooth undertones, next move on to the strawberry seeds. Normally I would say to save the crisp fine details like these until later, however with strawberries, many of the details of the skin’s texture bend and dip around the seeds. So it will make your painting easier if the seeds are patterned out first.
For these, do them on another new layer. Similar to the blocking step, draw out the seeds one by one using a crisp-edged brush like the “technical pen” using a yellow colour. Pay attention to how the seeds are closer together at the edges and further apart towards the top. These subtle charges really give the illusion of the berry’s shape and give it a three dimensional quality.

Once you’ve finished blocked the seeds, alpha lock the layer and go through and add a little darker tone to the bottom of each seed, and a brighter highlight to the top. This is a bit tedious, but is absolutely worth it for a realistic result. Put on some music here and get into the zone.
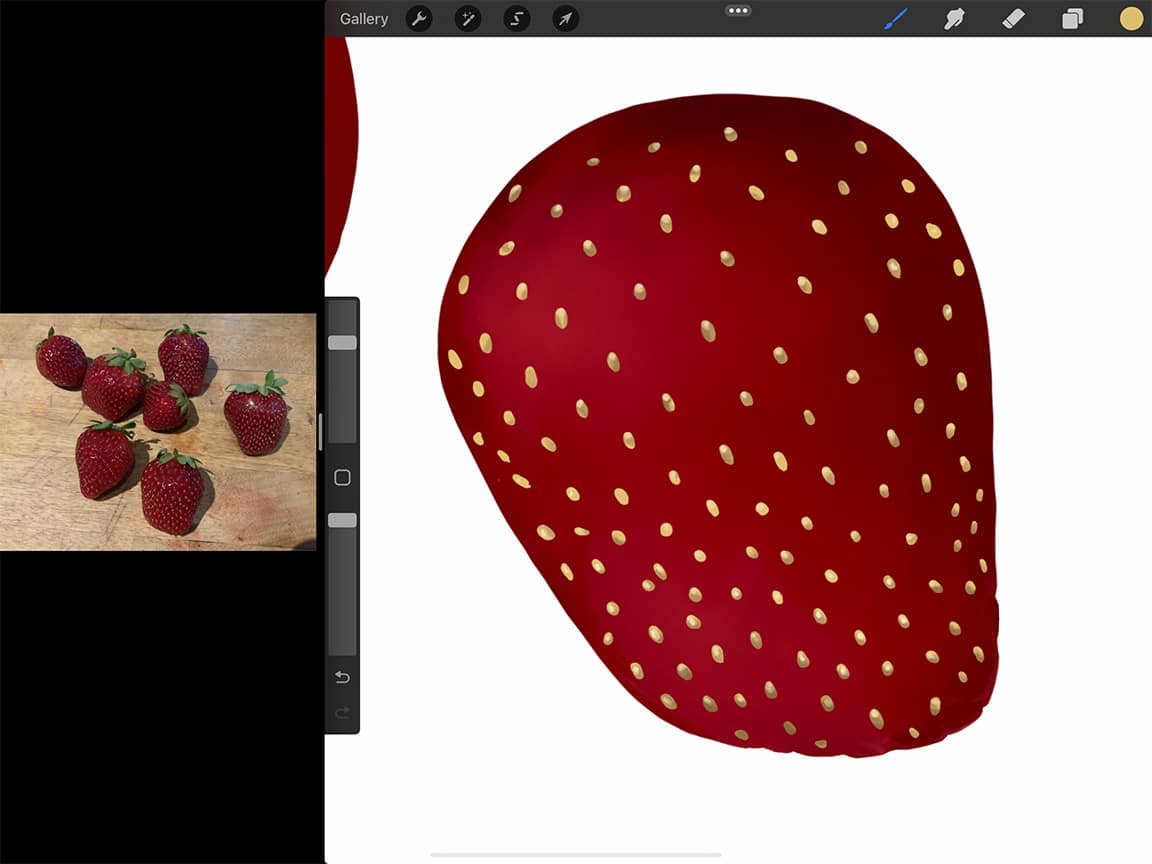
How to Draw Strawberries Step Five: Skin Texture
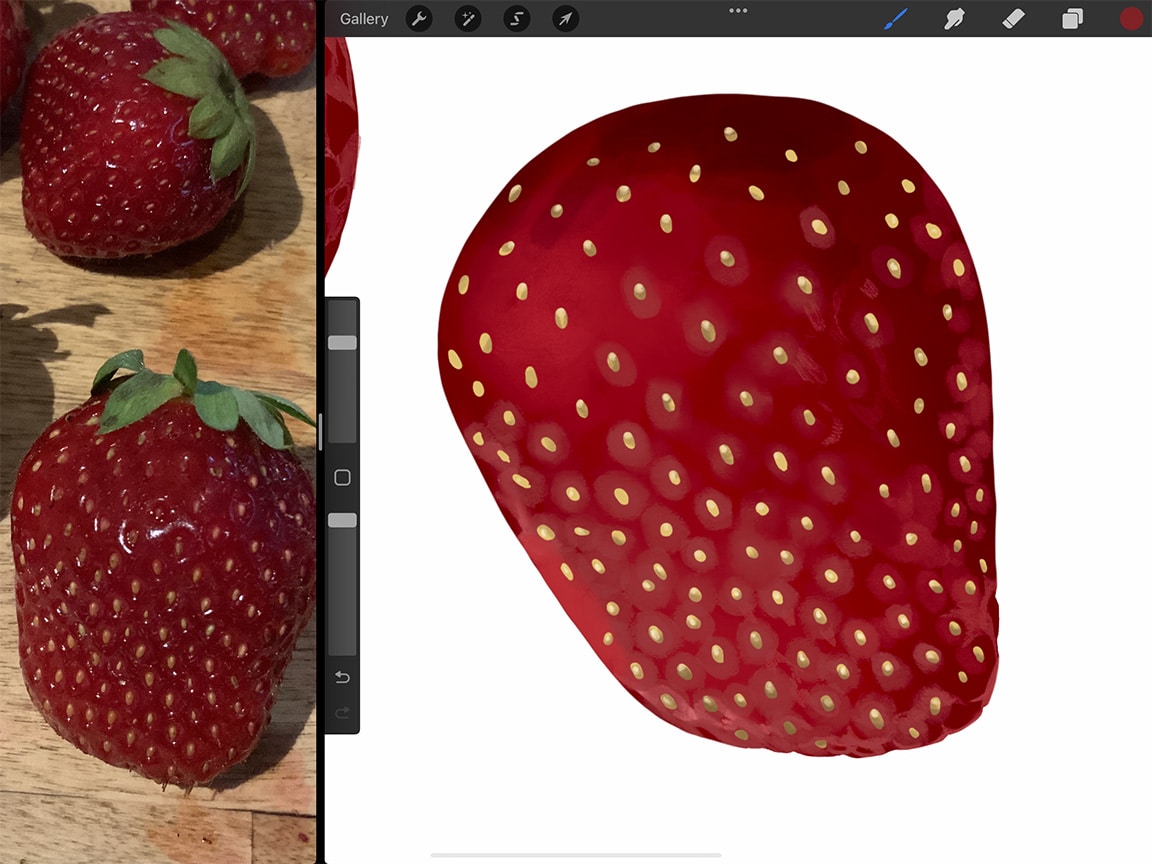
The next step to really give your strawberries their telltale look, is adding in finer details including highlights and lowlights that create that signature dimpled texture. Here it will be important to zoom in on your reference photo and pay close attention to the changes in tone and colour. Generally, each seed has a darker circle surrounding it. This is more pronounced toward the outer edges of each berry. Keep that in mind when you are going around and adding your highlights.
Feel free to experiment with different brush tips for different effects at this stage. Or even just changing the brush size for some nice variation in texture. I stuck mostly to the “gouache” brush for all of my details, and blended them out using the airbrushing tip on the smudge tool.
During this step it’s a good idea to work generally from darkest details to light. Meaning you finish off with the shiny, almost white highlights. To create a realistic shine, zoom in and really look at the reflective area.
There are often colours in there you may not expect. For example, most of the highlights on my strawberries were variations of red/pink, however in a few spots the reflecting light came off in blue tones.
How to Draw Strawberries Step Six: Repeat!
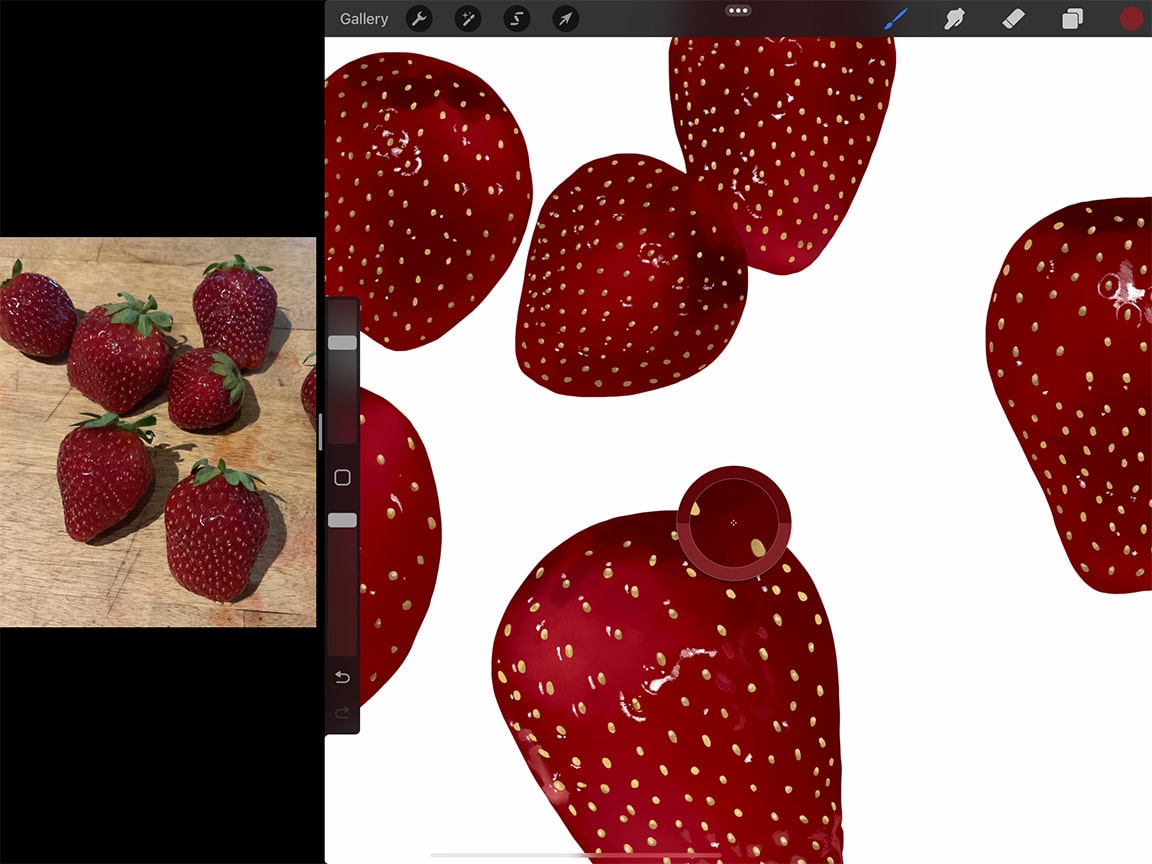
Now that you have your process down for drawing your first strawberry, you can go through and repeat this process for all the rest of the strawberries in your drawing. I decided to go through and do each step for all of the berries before moving on to the next step, but you can complete them in whatever order you like.
Remember when you get to the finer details, every strawberry is unique. However, as you go along you will get faster as you can “borrow” colour tones from strawberries you’ve already finished.

If you like a colour tone in your drawing and want to select it again, tap and hold the screen with one finger. A circle will appear that you can slide around until you are over the colour you want. Once you release your finger that colour will be selected for you to draw with again.
How to Draw Strawberries Step Seven: Leaves
I decided to leave drawing the greens on the top of each berry to the end. For this step the process is again the same – block, alpha lock, and then paint away.
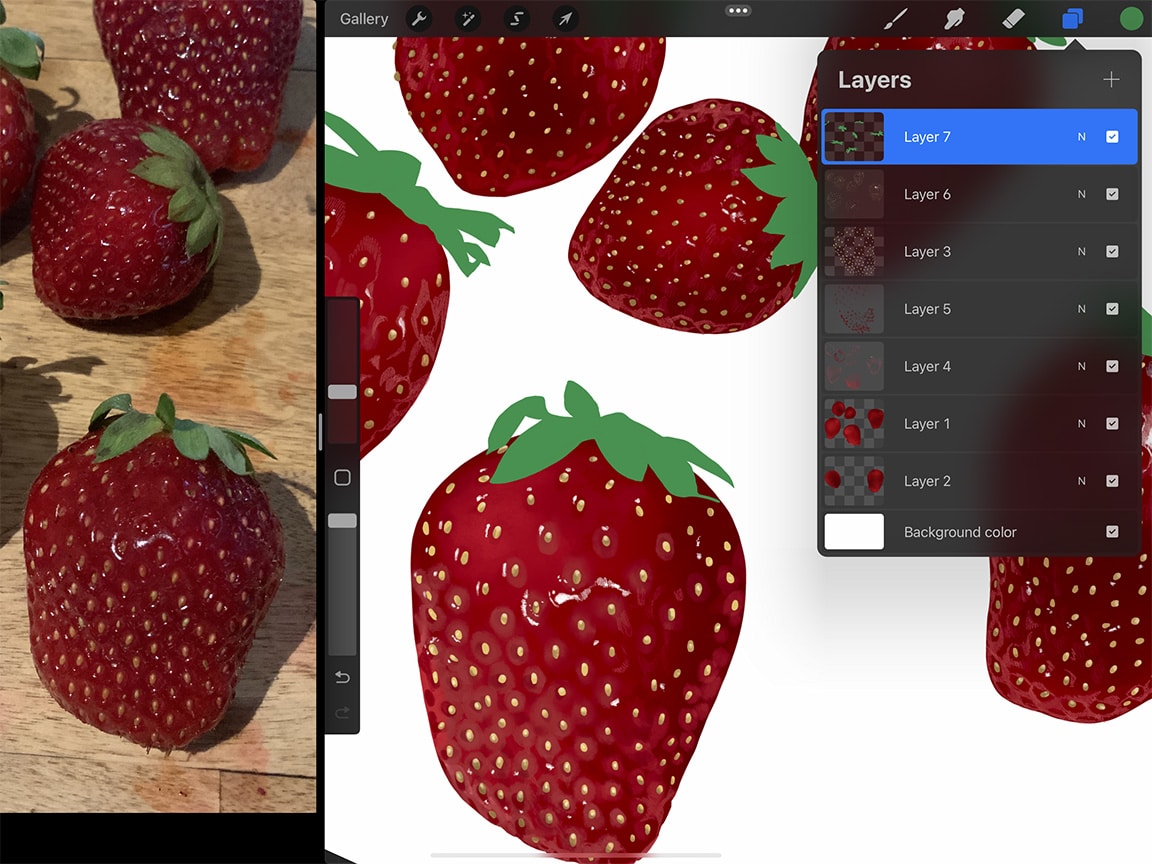
I found I was able to draw out the details of the individual leaves all on one layer just using variations in greens tones. One trick that is very helpful here though is drawing with the lasso tool. For the leaves there are some areas where there are very crisp edges, like the shadowy area under a leaf. Using this technique will allow you to blend out and draw each of those areas freely and separately without affecting one another.
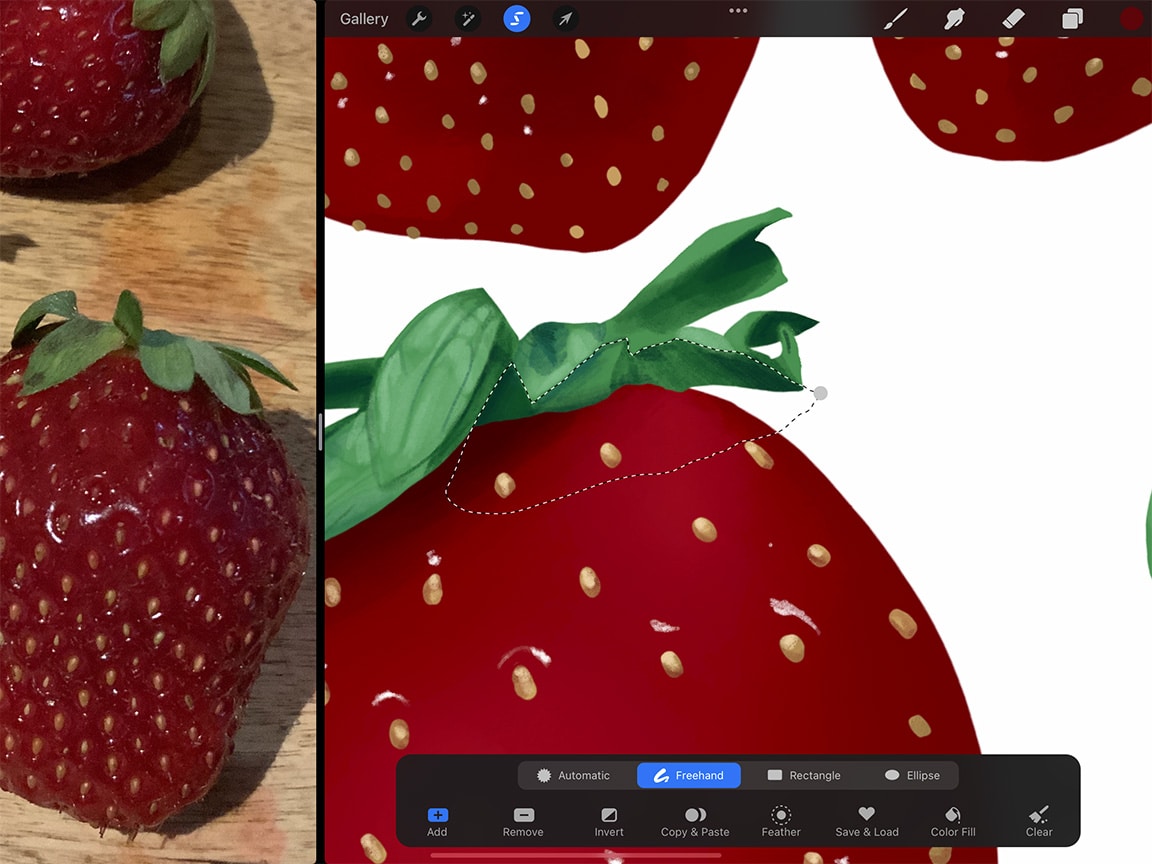
Start by tapping the lasso tool and then draw around the portion of the shape you want to draw on. Then tap the “brush” tool, and voila, you have your isolated portion of that layer to draw upon. Once you’ve finished painting and blending out that portion you can use the same method to trace out and isolate any other area. You may find this makes your drawing process easier.

How to Draw Strawberries Step Eight: Shadows
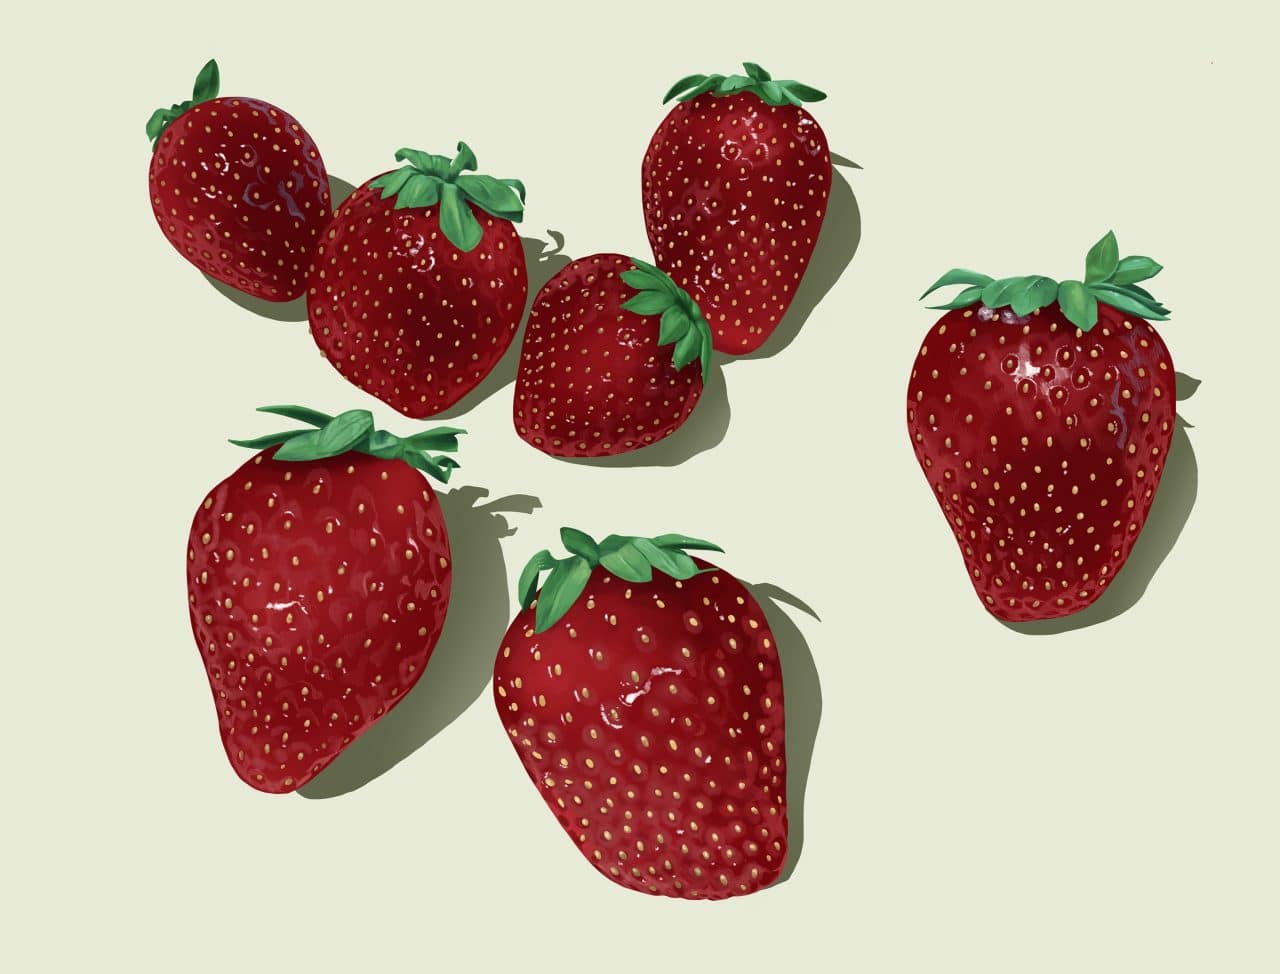
Finally, to complete the drawing I added some shadows to ground the strawberries.
For these, it’s important to choose your background colour first, because your shadows will be a darker shade of that colour. You can do so by opening the layers menu and tapping the “background colour” layer. I chose a pale yellow colour because I thought it complimented the red and green tones of the strawberries nicely. But this part is up to you, so choose whatever colour you like
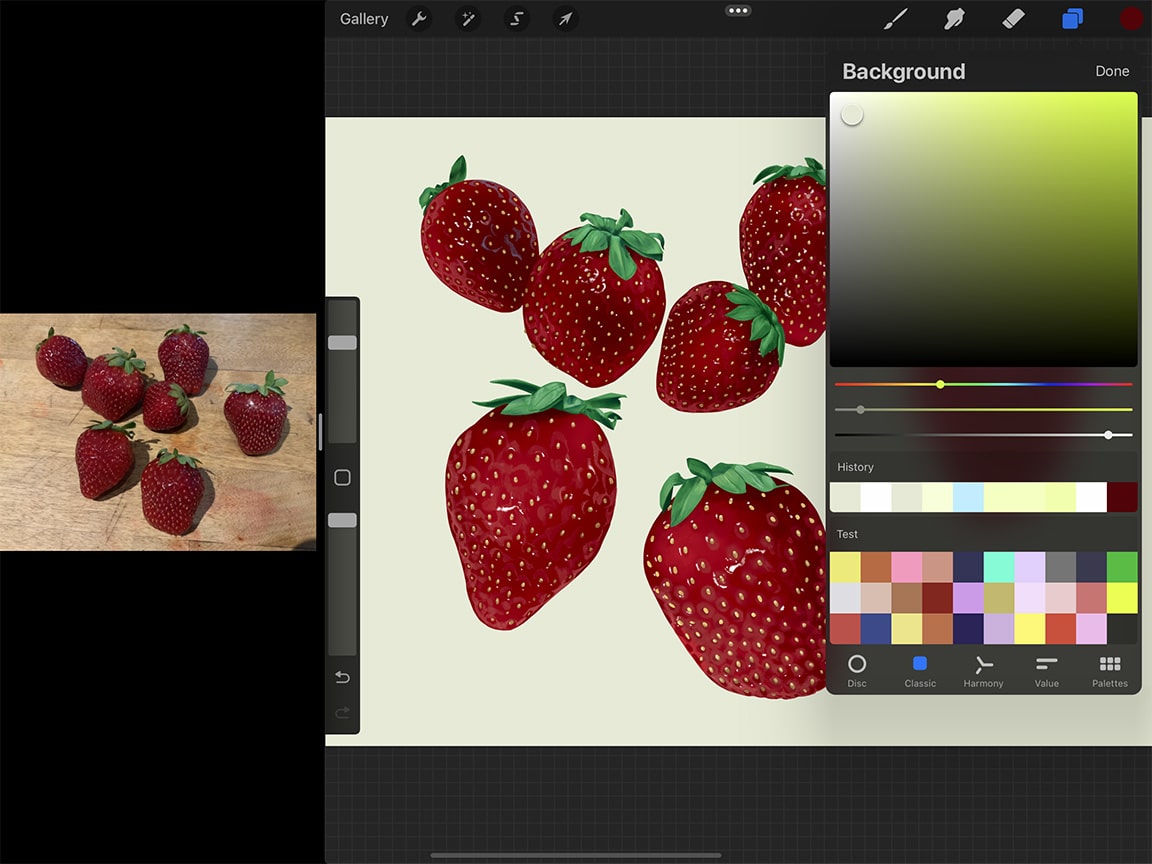
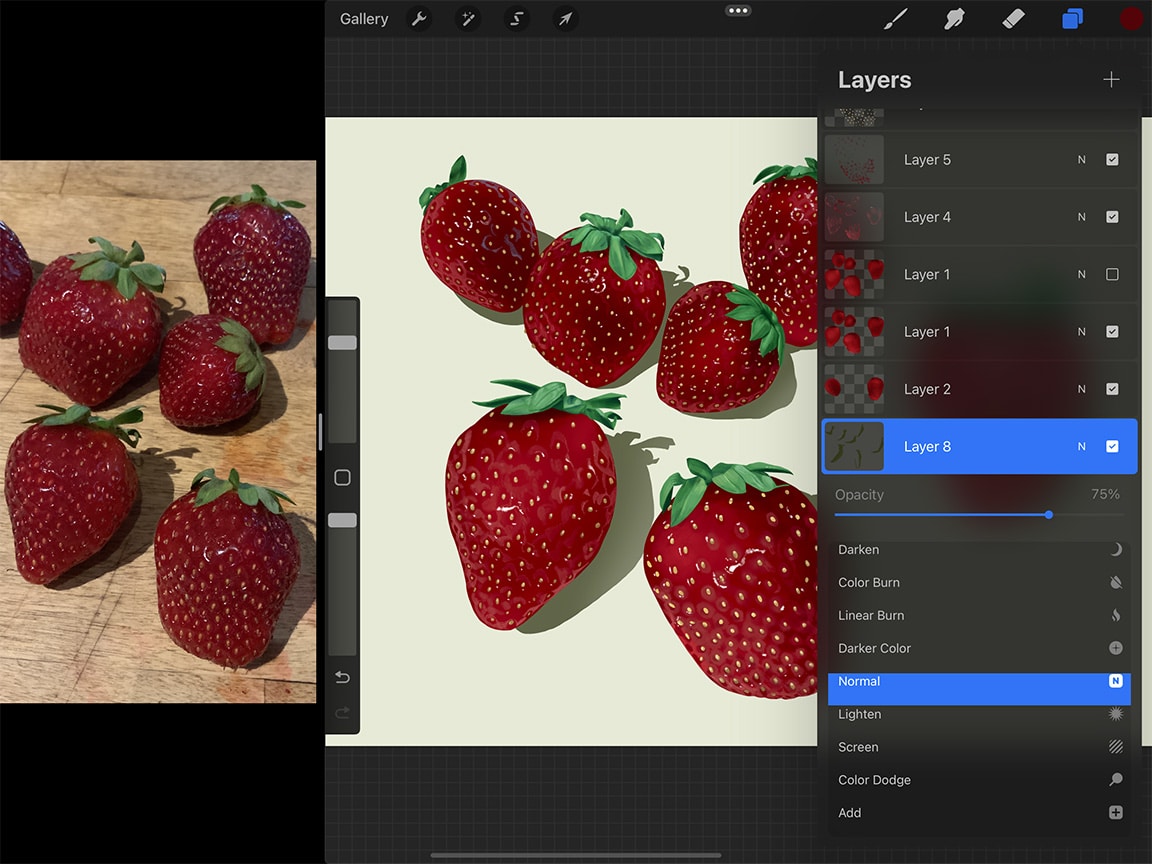
Now to do your shadows, once again start on a new layer positioned below the strawberry layers. Draw out your shadow shapes with a clean-edged brush (like the technical pen) and fill them in with a dark, nearly black shade of your background colour. Then you can use the layer’s opacity to make them slightly transparent to let the background colour come through.
To do so, open the layers menu, then tap the “N” on the shadow layer. Then you can adjust the slider to the transparency of your liking. I also used an airbrush eraser to create the subtle variations in darkness in my shadows.
And voila! Your finishing touch is done.
Helpful tips:
- To return to a colour you’ve already used, tap with one finger on the area with the colour you want to reselect, and hold. A magnifying circle will pop up and you can move that to the exact colour spot you want. Lift your finger and it will select that colour for your brush.
- You can zoom in and out by “pinching” the screen with two fingers. Don’t forget you can zoom in for areas with small details. You can also rotate the canvas using the two-finger pinch (rather than turning the iPad itself around, an inevitable habit when you’re used to turning your piece of paper around – there is an easier way!
You May Also Enjoy Reading…
- How To Draw Grapes
- How To Draw Blueberries
- How To Draw Carrots
- How To Draw Pears
- How To Draw A Broccoli
- How To Draw a Lemon
- How To Draw A Candle
- How To Draw Tomatoes
- How To Draw an Orange
- How To Draw Potatoes
- How To Draw Fish
- How To Draw Mountains
- How To Draw A Cottage
- How To Draw A Bottle
- How To Draw Shoes
- How To Draw Realistic Animals
- How To Start a Vlog: Purchase the Best Equipment for Vlogging
You’ve Completed our Realistic Strawberry Drawing Tutorial!
You’ve now mastered how to draw strawberries!
If you’re someone who draws or paints a lot, you know it’s possible to keep going and going and tweaking and tweaking into eternity. And truthfully Procreate makes falling into this even easier.
The up side, however, is that you can leave the piece alone for a time, and then very easily pick up where you left off, without having to get all of your paint and supplies out.
All that said, you will know when it’s done, and for a satisfying finish to your digital drawing experience, you can utilize one of my favourite Procreate features – time lapse video.
By default, Procreate records your entire drawing process (you can opt to turn this off, but really why?) You can play it all back in high speed when your drawing is complete. It’s a fun thing to watch and a fantastic thing to share with curious fans of your art.
If you’re a freelance illustrator, find that offering a time lapse video of your clients’ work acts as a competitive advantage. And better yet, offering a video that showcases the creation of your strawberry drawing requires no additional time or money.
By using this Procreate tutorial as your step-by-step drawing guide for how to draw strawberries, I’m sure you will be very satisfied with your result. Once you’ve gone through the motions from start to finish you can experiment and settle into your own process.
This medium has so many possibilities that you can really let your creativity run wild. So dive in, go digital and have fun!
Best Illustration Apps
This story offers a step-by-step Procreate tutorial on how to draw strawberries. It’s important to note that there are several other drawing apps you can use on iPad Pro when drawing strawberries. Here are just a few:
- Notes: The Apple sketch app that comes with your iPad! Simple, easy to use for quick sketches, free and fast. Though for serious drawing you may want to seek apps with more robust options/tools. Price: FREE
- Adobe Illustrator Draw: This app is for creating vector graphics, with a very intuitive interface. It can also sync with Adobe’s Creative Cloud, meaning you can transfer your work between the iPad and desktop no problem. Price: FREE with Creative Cloud subscription, monthly plan prices vary.
- Inspire: Fast and nicely responsive, with a huge variety of customizable tools, and over 80 brushes. Great for beginners and intermediates alike. Price:$13.99 CAD, $27.99 for Pro Version.
- Procreate: Easily one of the most popular drawing apps, it works seamlessly with Apple Pencil, is highly responsive and offers an excellent variety of tools, all presented in a terrifically simple interface. Price: $13.99 CAD
If you’re a newbie digital illustrator we also suggest purchasing Beginners Guide to Digital Painting in Procreate, iPad and iPad Pro for Dummies, a protective iPad cover and Apple Pencil Case.
Procreate Tutorial: The Benefits of iPad Pro
- The process is very similar to drawing using traditional methods on paper. You’ll be delighted by how intuitive it is, and how for the actual drawing part, you don’t need to re-learn anything.
- Streamlined process. All of your supplies – camera, reference photos, paper, pens, pencils, eraser, pencil sharpener, paint and paint brushes, are all combined into one place – iPad Pro and the Apple Pencil.
- The ability to undo when your pen stroke wasn’t quite right. You can also edit certain elements after the fact. The thickness of that piece is too much, I don’t quite like the colour I used here. All of that can be fixed!
- The ability to work in layers, drawing or colouring over or under certain elements without worrying about accidental erasing or colour contamination.
- You aren’t tethered to your desk, you can get comfy and work wherever you like. And that includes outside your own home too.
- Easy transferability/shareability of your art. Your finished product is already in a format that you can add to your illustration portfolio online, share on your social media, etc. No need to arrange a high quality scan or professional photograph.
- The ability to replicate elements, (for patterning, for example) rather than needing to hand-draw the same thing over and over.
If you’re a freelance illustrator looking to up your game, getting familiar with this medium will benefit you tremendously. And if you are an amateur who just loves to draw, looking to have fun creating strawberries or other still life drawings, iPad Pro and Apple Pencil can help you do things you might not have thought possible.
Some of the links in this story use affiliate links. This means that if you make a purchase through our site, Dobbernationloves will earn a small commission at no extra cost to you. Your support helps us to produce comprehensive content.
