Looking to learn how to draw a lemon?
This easy Procreate tutorial is here to help! Read along for a simple yet comprehensive step-by-step guide on how to draw realistic lemons digitally using iPad Pro.
Digital drawing continues to thrive as an exciting medium in the world of art. Many famous illustrators have created truly remarkable work using Procreate on iPad Pro, and now it’s your turn to try out the amazing tools this artistic medium has to offer.
This realistic lemon drawing Procreate tutorial will break down the process of illustrating on a tablet and set you up with the basics of this amazing app. We’ll use how to draw a lemon slice as our example!
How to Draw a Lemon: Drawing on iPad
I’m a Toronto illustrator who specializes in book illustration, portraiture, editorial illustration and exhibition design. Over the last few years the digital medium has become an important drawing tool for me and a integral part of my illustration process overall.
If you are new to digital drawing I am sure you’ll be amazed, both by how easy it is to pick it up, and by the new range of drawing potential it provides. Creating illustrations of everyday things around your home, like a lemon, with an Apple Pencil on iPad Pro, allows for new and advantageous ways of creating layers, texture, and dimension, and is also really quite fun.
Sketch A Lemon Drawing In The Kitchen
One of the best ways to become an expert on how to draw a lemon slice is by visiting your local grocery store. At my favourite specialty produce market in Toronto they sell a variety of lemons including Eureka, Avalon, Bush, Citron and Meyer.
The lemon is a species of small evergreen tree in the flowering plant family Rutaceae, native to Asia, primarily Northeast India, Northern Myanmar or China. A genomic study of the lemon indicated it was a hybrid between bitter orange (sour orange) and citron.
The tree’s ellipsoidal yellow fruit is used for culinary and non-culinary purposes throughout the world, primarily for its juice, which has both culinary and cleaning uses. The pulp and rind are also used in cooking and baking.
The juice of the lemon is about 5% to 6% citric acid, with a pH of around 2.2, giving it a sour taste. The distinctive sour taste of lemon juice makes it a key ingredient in drinks and foods such as lemonade and lemon meringue pie.
We suggest purchasing a variety of lemons for your drawing. A diversity of colours, shapes and textures helps make a still life fruit portrait more interesting. Be sure to arrange the lemons on your kitchen counter to photograph in ample natural light.
You’ll of course need to use up those lemons once you’re finished drawing. Some of our favourite lemon recipes include Ndunderi Amalfi Lemon Ricotta Gnocchi, Blueberry Lemon Muffin Tops, Sour Lemon Blueberry Gin Cocktail, Fresh Berry Lemonade Summer Whiskey Cocktail, Lemon Lavender Shortbread Cookies, Warm Orzo Lemon Salad, Garlic Lemon Chickpea Avocado Salad and Garlic Boursin and Lemon Linguine with Grilled Chicken.

Lemon Drawing Procreate Tutorial
Sour, fresh, and fabulous, lemon is a favourite flavour and a food staple in many parts of the world.
Lemons also work marvelously as a subject for still life drawing. Still life drawing uses non-living, everyday objects that are good at holding still, as subjects to practice drawing techniques like light and shadow, colour, shape and texture. Fruit has long been a favourite subject for still life artists.
Bright, shiny, and cheerfully coloured, lemons are beautiful, and are the perfect object to challenge yourself to capture the things that make a drawing look realistic.
And lucky for you Procreate makes recreating telltale citrus fruit features in your drawing fun and easy. So pucker up pussycats, cause this procreate tutorial on how to draw lemons will break down the process into separate steps that will have you creating a still life lemon masterpiece in no time!
Not to mention, the Procreate methods you’ll practice using in this tutorial will create the benefit of adding many exciting new tools to your art arsenal!

How to Draw a Lemon with iPad Pro
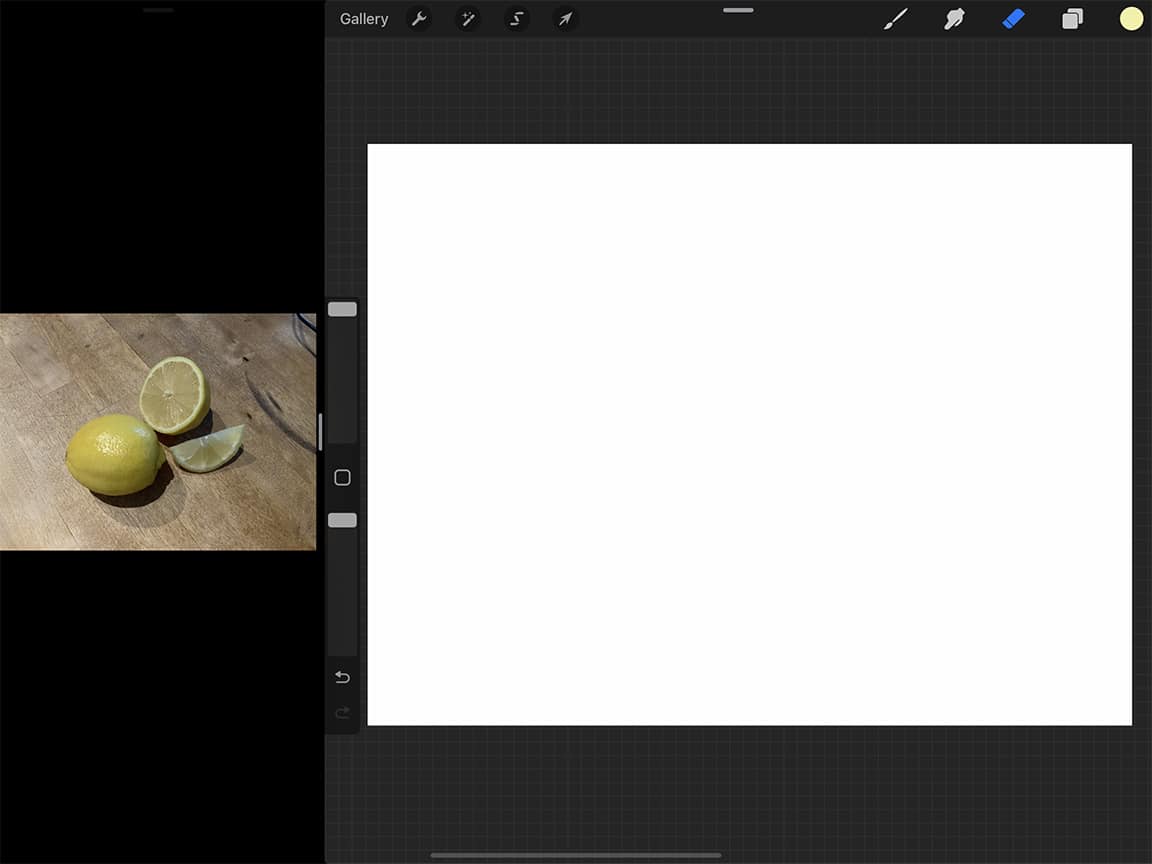
Let’s first get set up with a new canvas in Procreate. When you first open the app you’ll be in the “gallery” where all of your artworks will be visible. Tap the “+” in the top right of the screen and a menu will appear where you can select your canvas size.
To choose your dimensions click “create custom canvas” and enter them (in mm, cm, inches, or pixels). You can simply select “screen size,” however I recommend going bigger so that you have the option to print your finished piece with a nice resolution.
For my lemon drawing I’ve created a 11″ x 14.5″ canvas. For a canvas this size I’ve gone with a resolution of 300 DPI, which allows for up to 35 layers. If you go too big the maximum number of layers you can have in your artwork can be too few for our purposes, so this is a good size.
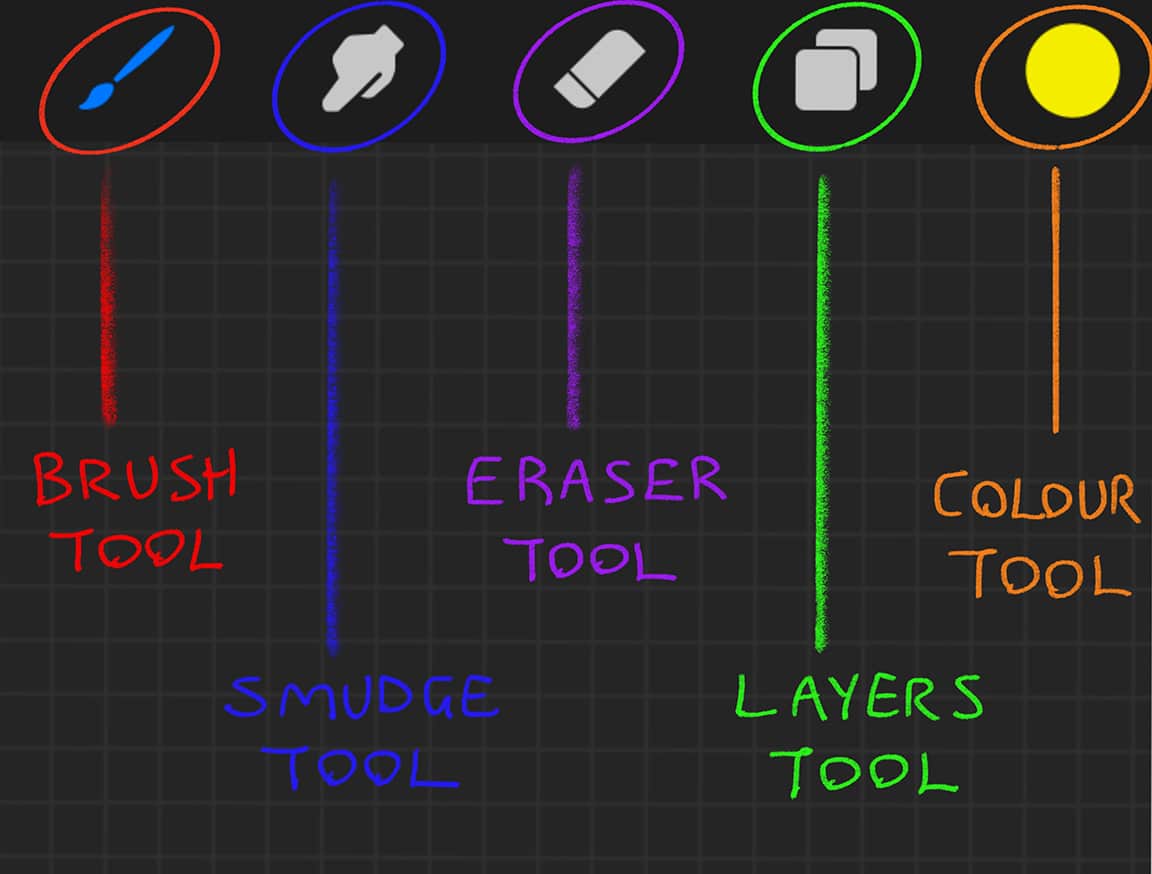
Now it’s important to explore and familiarize yourself with Procreate’s basic tools. Starting with the toolbar on the top right of your canvas.
- The Brush Tool: This is the tool with which you draw/paint. Tap it to open your Brush Library. Procreate’s brushes are categorized in a list down the left side of the drop down menu. Tap any of these to see your brush options in each category. Choose what you like and then tap the brush icon in the toolbar again to close the menu. Now get scribbling! Try a few different brushes and use different pressures and angles of the Apple Pencil – it’s remarkably realistic in its response to your hand.
- The Eraser Tool: It does exactly what you think it does! Tap it and you’ll open an identical Brush Library as tapping the brush tool. Try a few and see how it erases your scribbles.
- The Colour Tool: This is your colour palette. Tap and it will open in its default view of “Disc.” Use the outer wheel to select colour, and the inner circle to select lightness/darkness. Or you can use the square view that combines the two. When you’ve chosen the colour you want to use, tap the colour icon in the toolbar again to close the menu. Again, do some scribbling! Choose a variety of brush and colour combinations to get a feel for the colouring process.
- The Smudge Tool: This is used to blend colours and create gradients. This tool has the same effect as taking your finger to pencil on paper and rubbing it to blend. The smudge tool mimics the real thing fairly well but it does take some getting used to.
- The Layers Tool: You can use this menu to create multiple layers on your canvas, and select between them. How to do this, and the benefits of layers, will be best understood by following through my own example here in this Procreate tutorial.

Then there are the slider toolbars on the left side of your canvas.
- Brush Size: The top slider. Tap, hold and move up and down to adjust the size of your brush tip. A preview window will open up to help guide you. This slider is used for your brush, smudge and eraser tools in the same way.
- Brush Opacity: The bottom slider. This works the same way as the brush size slider, but is for brush opacity.
- Undo/Redo: Under the sliders you’ll see these two buttons. Tapping the undo button will undo the last stroke you drew/erased. Vice versa with the redo button. This is a very useful tool you’ll probably use a lot. You can also undo by tapping once anywhere on your canvas with two fingers.
There is also the toolbar in the top left of your canvas. For these tools I will point them out and explain them along the way as we need them.

How to Draw a Lemon Step One: Choosing a Reference Photo
If you can take your reference photo yourself, great. You can use the iPad itself to capture a good photo. If you don’t have any lemons handy, there are plenty of images online for you to choose from. It’s a good idea to chose one that is copyright free and there are several websites that have large libraries of free images.
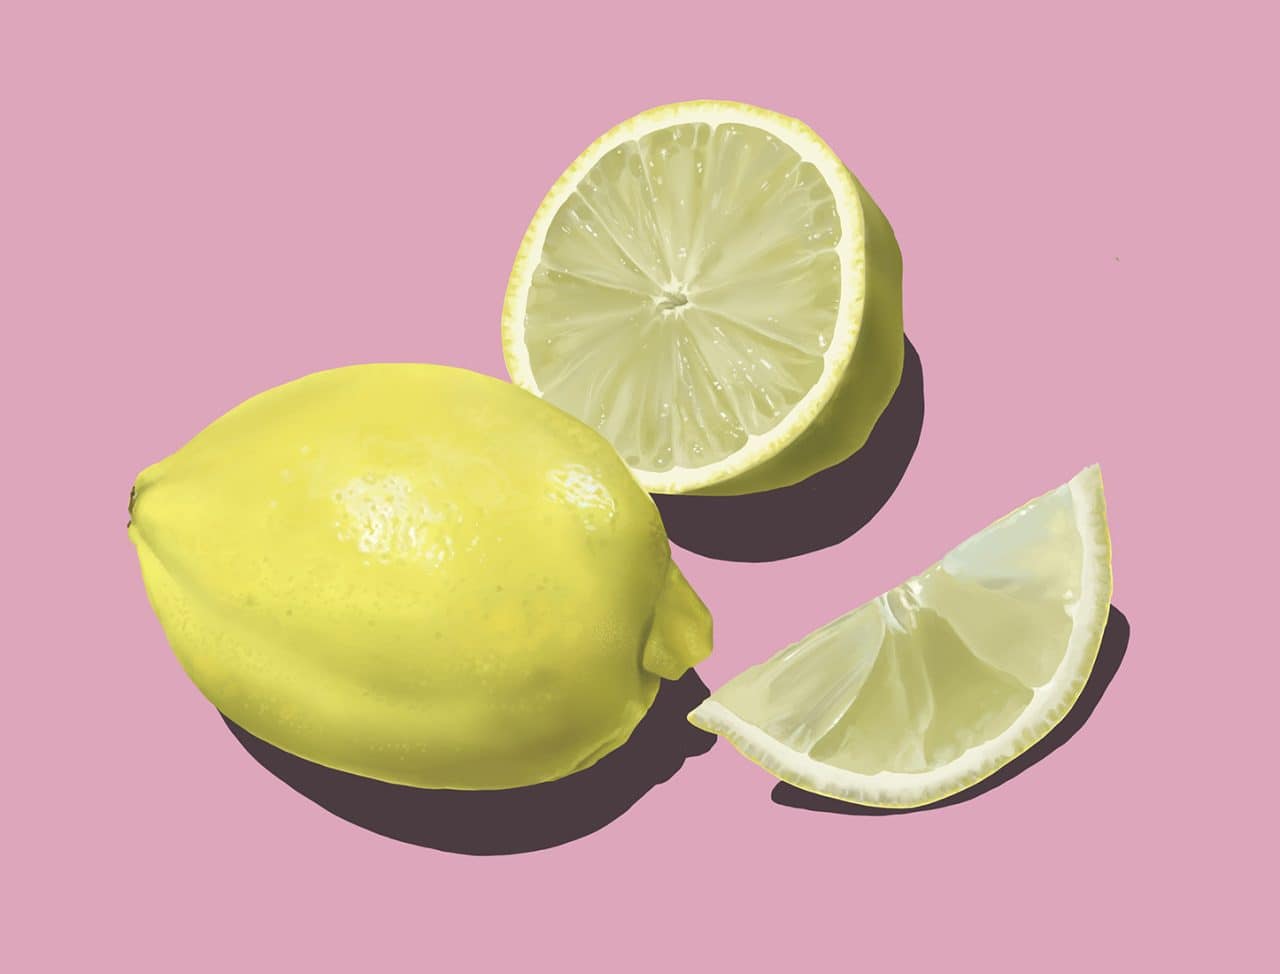
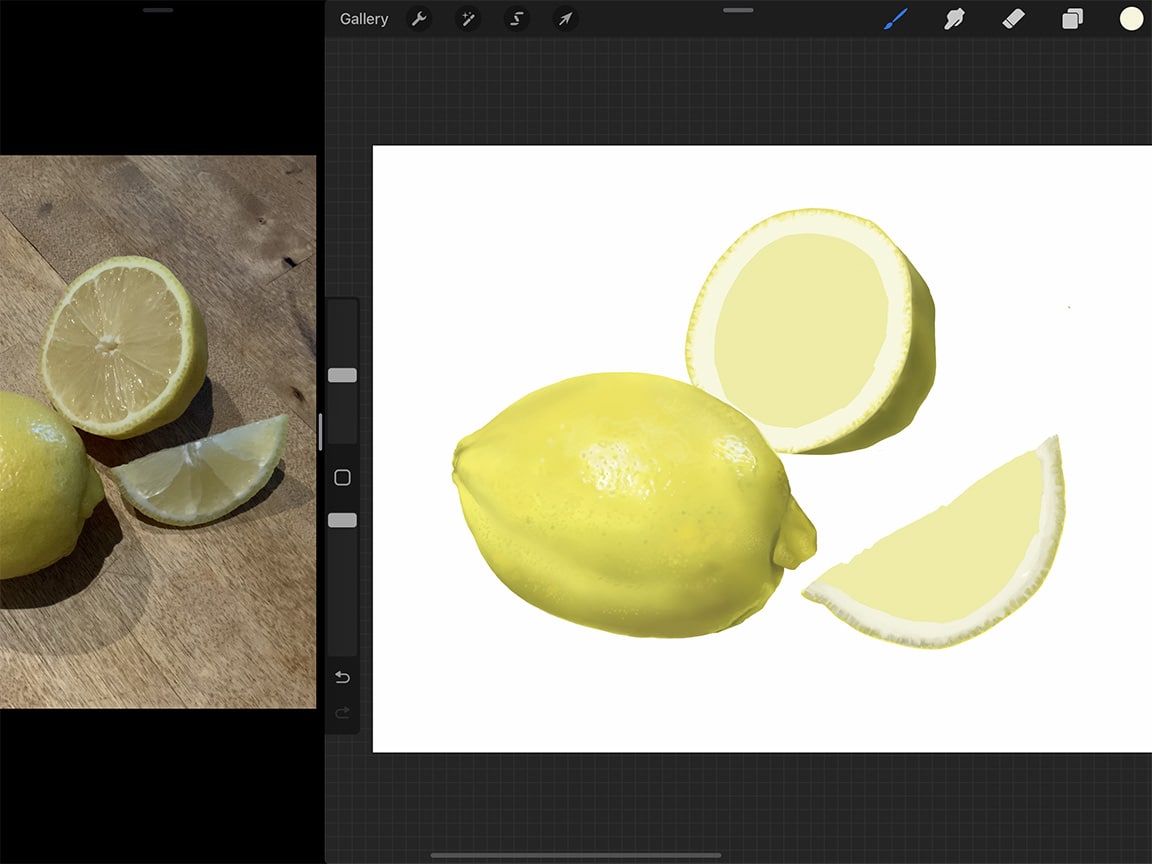
I took my reference image myself in my kitchen. I included one whole lemon to capture the skin, one lemon that I cut in half for a full cross section, and one lemon wedge, just for a bit of variation. I arranged them in a spot where they were well-lit and that I could take a nice clear photo that captured the glistening quality of the juice.

The first thing to do before you get to drawing is setting up your reference photo to work from. A great option with iPad Pro is that you can keep your photo open in a window beside your Procreate canvas while you work.
To do so, tap and hold the bar at the bottom centre of the screen in Procreate, then slowly pull up the iPad menu (if you swipe too quickly you’ll close Procreate).
Once the menu is up, tap and hold the photos icon, and drag it to the left side of the screen (or right side, for the lefties out there!) Pull it past the edge of the Procreate window and drop it there and tada, you have both open at the same time. You can also adjust the size of the photo window by holding and sliding the side bar of the window.
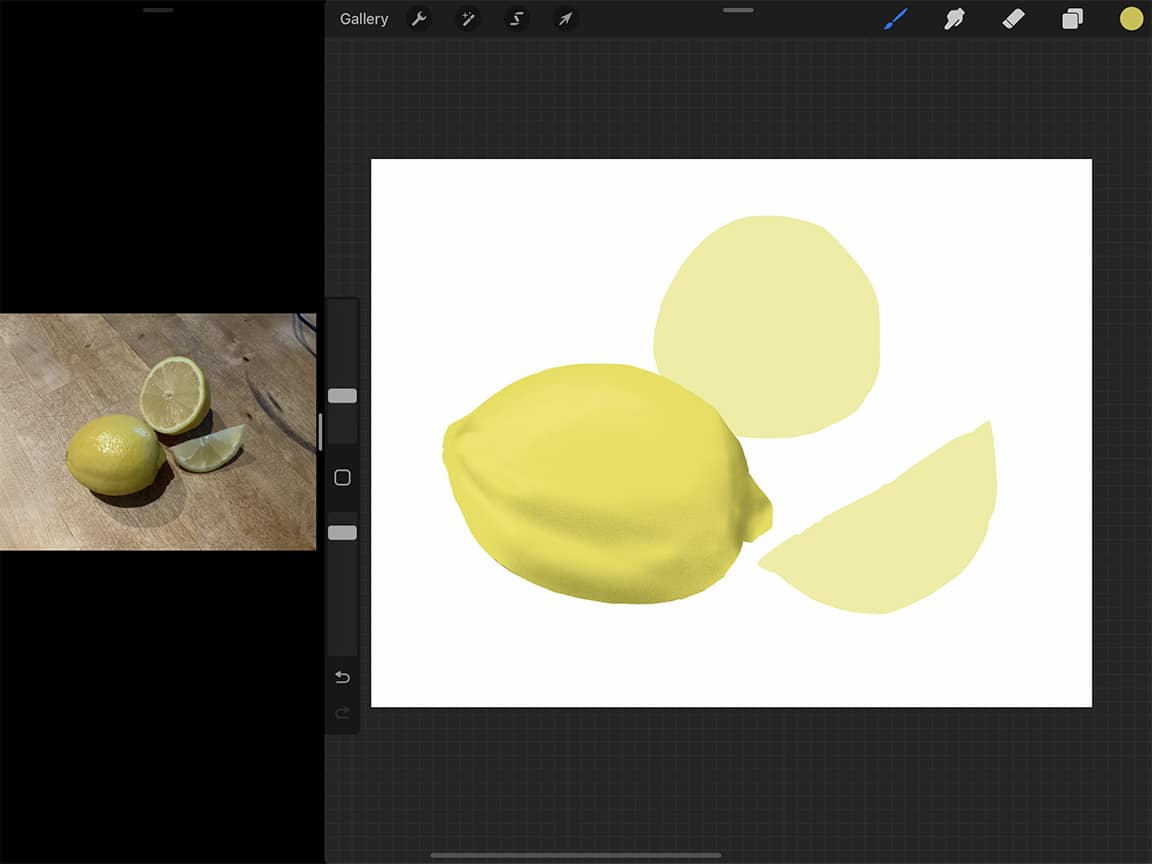
How to Draw a Lemon Slice Step Two: Blocking
Now you are set up to start drawing lemons!
The first step will be blocking out the shapes of the lemon and lemon slices with a solid colour. You’ll do this on a new layer. For this outline I used the studio pen brush under “inking” in the brush menu, because it gives a nice clean line. To determine which colour to use, I took a look at my lemon reference photo and tried to match it generally to the “average” colour tone of each of the pieces. Your outline does not need to be perfect by any means (part of the beauty of drawing fruit is that it is naturally imperfect!)
Once you have a fully enclosed shape, you can fill it in with solid colour by tapping and holding the colour icon in the top right, and then dragging it to the inside of your shape and releasing. The shape will then fill with that colour.
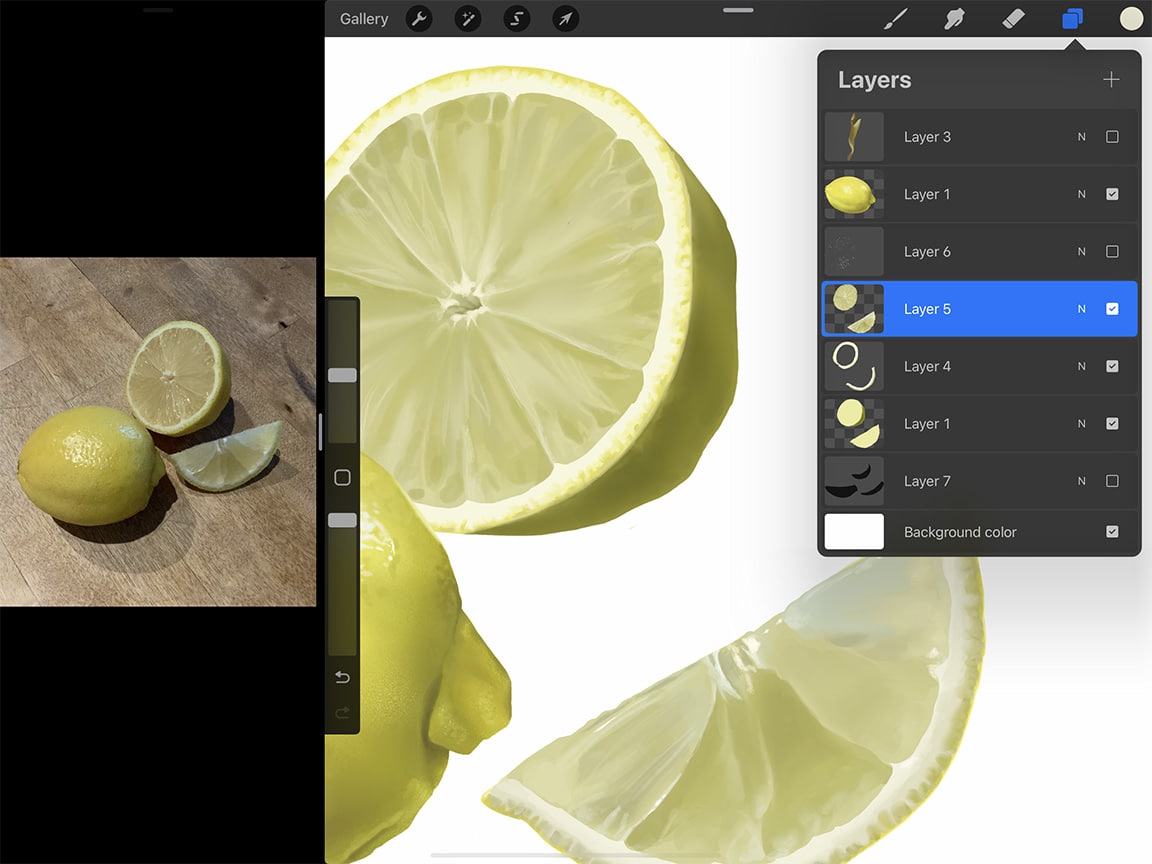
I created the colour-blocked shapes for the lemon half and lemon wedge on a separate layer from the whole lemon. This will make editing each portion possible without interfering with the other pieces. To create a new layer tap the “layers” icon in the top right menu and then tap the “+”. You can change the position of each layer by tapping it in the layers menu, holding and dragging it above or below other layers.

Take your time with these shapes and adjust until you get the proportions and placement of all the features where you want them. You can adjust the size and position of different elements in your drawing by utilizing the “lasso” tool. That is the tool in the top left menu that looks like the letter “S”. Tap it, and then make sure “freehand” is highlighted in the bottom menu.
Then you can use your Apple Pencil to draw around the part you want to adjust. For example, I wanted the lemon wedge to be closer to the centre and tilted a bit further, and the half lemon moved slightly behind the whole lemon. One you’ve traced around the element you want to adjust, tap the cursor tool in the top left menu and you’ll see a bounding box appear which you can use to make those adjustments.

How to Draw a Lemon Step Three: Underlying Gradients
Now that you have your base layers of colour you can start “painting” and adding layers of colour to build up the texture and details of your lemons. Take a good look at your reference photo and try to see the underlying gradients of light and dark tones beneath all of the finer details.
I started first with the complete lemon.
For this part you do not necessarily need to be very tidy with your painting. You can roughly paint out lighter and darker areas and then blend and smooth them out using the smudge tool. For this part I chose the “Noise” brush under “materials” in the brush menu, because it naturally creates a slightly spotty texture that is similar to the texture on the lemon skin. This way you can leave certain portions unblended to maintain that textured effect.

Procreate has a feature that makes this blending part a lot easier, called the alpha lock. If you “alpha lock” a layer, you can only paint on what already exists on that layer. Meaning when blending out some colours you don’t need to worry about your smudges coming past the edges of you blocked out shape.
To alpha lock a layer, open the layers menu. Using two fingers, swipe the layer you want to lock to the right. If you’ve done it successfully the layer thumbnail will get a checkered background. To un-lock the layer at any point simply swipe it with two fingers to the right again.

Play around with your painting until you have a gradient that still evokes the underlying texture of the lemon skin. Remember you can always undo any stroke you take by tapping two fingers anywhere on the screen.
Lemon Drawing Step Four: Highlights and Lowlights
Once you have the underlying tone gradients complete you can start adding in the finer details. This is where it is helpful to zoom in and take a good look at the variations in tones and patches of spots and dimples along the lemon skin.
Feel free to experiment with different brush tips for different effects. For example, to create the pattern of small pore-like spots across the skin I selected the “gouache” brush, under “painting,” and increased the brush size to quite large to give that effect. I also took the Dove Lake brush and brought the brush size down very small to draw in some lighter and darker patches.
How to Draw a Lemon Step Five: Finishing Details
For the lemon skin the finishing details include the sharper spots and dimples, the blossom, and the very bright reflections of light. I recommend doing these on another new layer so you can edit them without messing up the gradients and textures you’ve already created underneath. I forgot to do this in my drawing and I regretted it!
For the dimples, zoom in to your reference and take a look at the patterns of light and dark that create the sunken and risen shapes, and pay attention to where the strong white reflection of light falls along these shapes. If you look closely there is a pattern and sensical quality to all of it. Take your time here and let yourself get lost in the drawing process.

How to Draw a Lemon Step Six: Lemon Half and Lemon Slice
Now it’s time to repeat this process for the other lemon pieces. For these the process is slightly different given the new textures of the lemon pith and interior sections.
The first part I rendered was the bit of lemon skin that is showing on the lemon half. Here I utilized the lasso tool again, but this time in a different way. Since the skin here required blending yet still had a hard edge against the inside portion of the lemon, I wanted to isolate that portion for drawing. To do this, tap the lasso tool and then draw around the skin portion of the shape. Then tap the “brush” tool, and voila, you have your isolated portion of that layer to draw upon.

Draw out that darker lemon skin portion using the same steps from above for the whole lemon.
Next we’ll move on to the white pith underneath the skin. For this you can either trace out the interior section, or just start on a new layer (which is what I did). Looking closely I see that the pith at the edge of the interior is mostly an off-white with a touch of yellow toward the lemon exterior. To start off, draw a circle of the pale pith, and then a ring of yellow, see the example here:
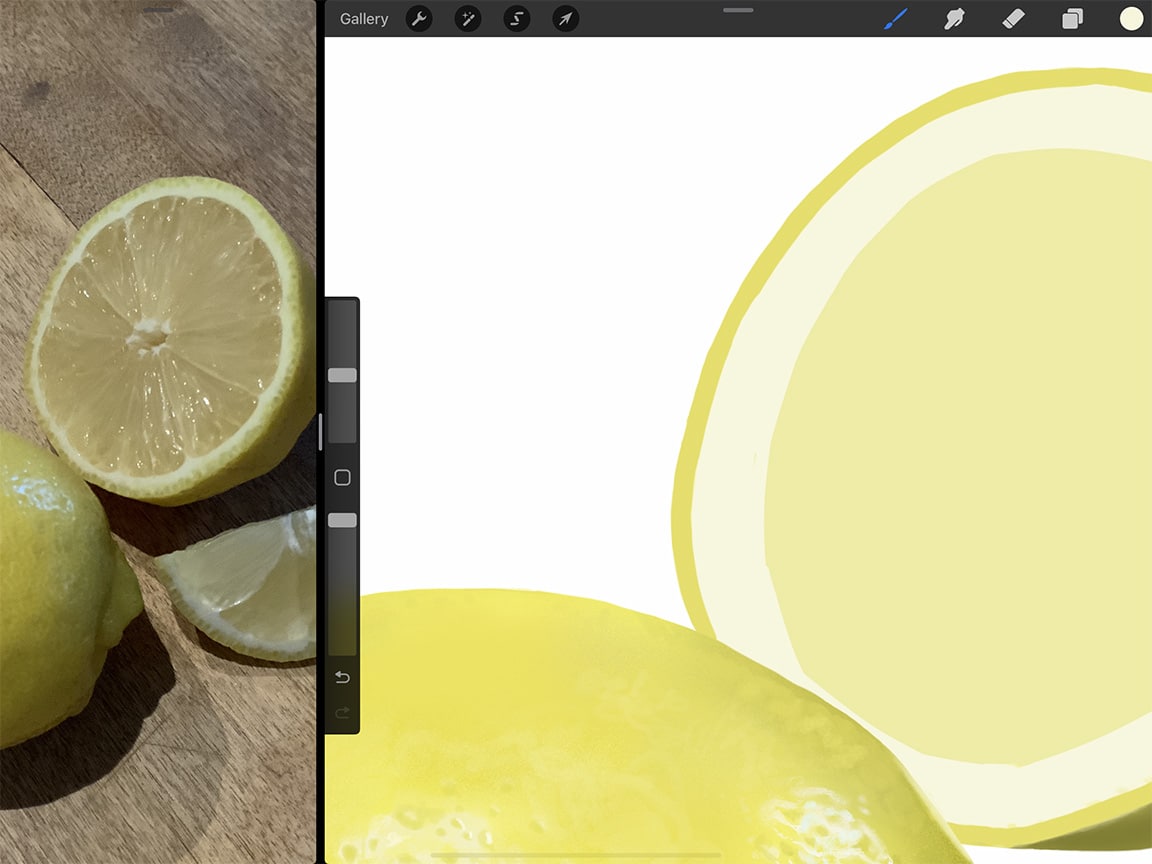
With the alpha lock engaged on this layer, now take your smudge tool bring it down in size to quite small and use it to roughly blend the off-white and yellow, following the reference photo. If you just sort of tap along you’ll be able to create a fairly convincing recreation of the edge of the skin/pith.
Next create a new layer for the juicy interior lemon sections. You’ll draw these on a new layer because the edge between the pith and fruit is quite sharp, and a new layer will help us maintain that crisp edge. Block the juicy fruit portions out using the same method as for the basic shapes, and from here you can again experiment with different brushes to create the texture of the fruit fibres, membranes and their wet, juicy quality.
Finish of these sections in the same way you finished off the lemon skin. Use a separate layer to add the bright white highlighting that creates the juicy effect. For this I used the technical pen tool because the white portions have a mostly crisp edge when you zoom in and look at them.
Finally, to complete the drawing I added some shadows to ground the fruit. For these, once again start on a new layer positioned below the lemons. Draw out your shadow shapes with a clean-edged brush (like the technical pen) and fill them in with a dark, nearly black colour. Then you can use the layer’s opacity to make them slightly transparent to let the background colour come through.
To do so, open the layers menu, then tap the “N” on the shadow layer. Then you can adjust the slider to the transparency of your liking.
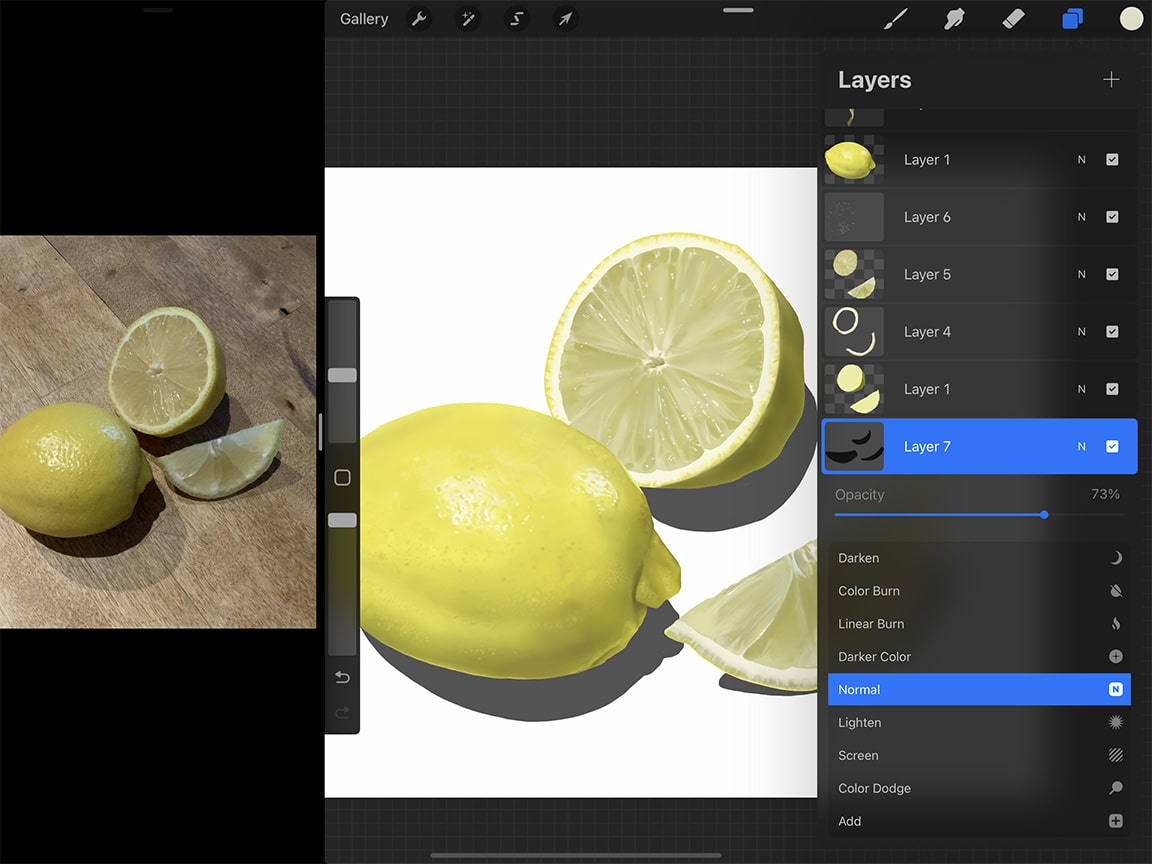
The last detail is choosing a background colour. You can do so by opening the layers menu and tapping the “background colour” layer. I chose pink (obvi) because who doesn’t like to be reminded of a tall glass of pink lemonade? Also because that colour with the bright luscious yellow of the lemon is a treat for the eyes. But this part is up to you, so choose whatever colour you like!
Helpful Tips
- To return to a colour you’ve already used, tap with one finger on the area with the colour you want to reselect, and hold. A magnifying circle will pop up and you can move that to the exact colour spot you want. Lift your finger and it will select that colour for your brush.
- You can zoom in and out by “pinching” the screen with two fingers. Don’t forget you can zoom in for areas with small details. You can also rotate the canvas using the two-finger pinch (rather than turning the iPad itself around, an inevitable habit when you’re used to turning your piece of paper around – there is an easier way!)
- Making corrections – After you have finished a detail in your illustration, you may realize that it’s perhaps not quite the right shape, or the proportions were a little off. An amazing feature of Procreate is that rather than erasing and drawing it again (a lot of work!) you can instead isolate a portion of the drawing and stretch it. To do this, you can use the lasso tool again to trace around the area you want to stretch. Once you’ve done that, tap the cursor icon (the fourth icon in the menu at the top left of your screen). This will create a bounding box around the area you want to manipulate. From there you can stretch the area how you like using the pull points. Once you have it where you want it tap the cursor icon again.
You May Also Enjoy Reading…
- How To Draw an Orange
- How To Draw Potatoes
- How To Draw Fish
- How To Draw Mountains
- How To Draw A Cottage
- How To Draw A Bottle
- How To Draw Shoes
- How To Draw Realistic Animals
- How To Start a Vlog: Purchase the Best Equipment for Vlogging
You’ve Completed our Realistic Lemon Drawing Tutorial!
You’ve now mastered how to draw lemons!
If you’re someone who draws or paints a lot, you know it’s possible to keep going and going and tweaking and tweaking into eternity. And truthfully Procreate makes falling into this even easier. The up side, however, is that you can leave the piece alone for a time, and then very easily pick up where you left off, without having to get all of your paint and supplies out.
All that said, you will know when it’s done, and for a satisfying finish to your digital drawing experience, you can utilize one of my favourite Procreate features – timelapse video. By default, Procreate records your entire drawing process (you can opt to turn this off, but really why?) You can play it all back in high speed when your drawing is complete. It’s a fun thing to watch and a fantastic thing to share with curious fans of your art. If you’re a freelance illustrator, find that offering a timelapse video of your clients’ work acts as a competitive advantage. And better yet, offering a video that showcases the creation of your lemon drawing requires no additional time or money.
By using this Procreate tutorial as your step-by-step drawing guide for how to draw lemons, I’m sure you will be very satisfied with your result. Once you’ve gone through the motions from start to finish you can experiment and settle into your own process. This medium has so many possibilities that you can really let your creativity run wild. So dive in, go digital and have fun!

Best Illustration Apps
This story offers a step-by-step Procreate tutorial on how to draw lemons. It’s important to note that there are several other drawing apps you can use on iPad Pro when drawing lemons. Here are just a few:
- Notes: The Apple sketch app that comes with your iPad! Simple, easy to use for quick sketches, free and fast. Though for serious drawing you may want to seek apps with more robust options/tools. Price: FREE
- Adobe Illustrator Draw: This app is for creating vector graphics, with a very intuitive interface. It can also sync with Adobe’s Creative Cloud, meaning you can transfer your work between the iPad and desktop no problem. Price: FREE with Creative Cloud subscription, monthly plan prices vary.
- Inspire: Fast and nicely responsive, with a huge variety of customizable tools, and over 80 brushes. Great for beginners and intermediates alike. Price:$13.99 CAD, $27.99 for Pro Version.
- Procreate: Easily one of the most popular drawing apps, it works seamlessly with Apple Pencil, is highly responsive and offers an excellent variety of tools, all presented in a terrifically simple interface. Price: $13.99 CAD
If you’re a newbie digital illustrator we also suggest purchasing Beginners Guide to Digital Painting in Procreate, iPad and iPad Pro for Dummies, a protective iPad cover and Apple Pencil Case.
Procreate Tutorial: The Benefits of iPad Pro
- The process is very similar to drawing using traditional methods on paper. You’ll be delighted by how intuitive it is, and how for the actual drawing part, you don’t need to re-learn anything.
- Streamlined process. All of your supplies – camera, reference photos, paper, pens, pencils, eraser, pencil sharpener, paint and paint brushes, are all combined into one place – iPad Pro and the Apple Pencil.
- The ability to undo when your pen stroke wasn’t quite right. You can also edit certain elements after the fact. The thickness of that piece is too much, I don’t quite like the colour I used here. All of that can be fixed!
- The ability to work in layers, drawing or colouring over or under certain elements without worrying about accidental erasing or colour contamination.
- You aren’t tethered to your desk, you can get comfy and work wherever you like. And that includes outside your own home too.
- Easy transferability/shareability of your art. Your finished product is already in a format that you can add to your illustration portfolio online, share on your social media, etc. No need to arrange a high quality scan or professional photograph.
- The ability to replicate elements, (for patterning, for example) rather than needing to hand-draw the same thing over and over.
If you’re a freelance illustrator looking to up your game, getting familiar with this medium will benefit you tremendously. And if you are an amateur who just loves to draw, looking to have fun creating lemons or other still life drawings, iPad Pro and Apple Pencil can help you do things you might not have thought possible.
Some of the links in this story use affiliate links. This means that if you make a purchase through our site, Dobbernationloves will earn a small commission at no extra cost to you. Your support helps us to produce comprehensive content.