Researching how to start a vlog but don’t know where to start? You’re likely shopping for the best equipment for vlogging and our favourite Youtube experts are here to offer their tips and tricks.
Our comprehensive guide on how to start a vlog and vlogging basics features interviews with popular vloggers and videographers. They offer helpful suggestions on purchasing the best equipment for vlogging, from underwater cameras to tripods, lighting, and film editing software.
Save this story to Pinterest so you can look at it later!

How To Start a Vlog
Starting in the mid-2000s vlogs or video logs, began to take off on Youtube and social media. Creative and quick, the vlogging style format resembles everything from the simple and unvarnished style of Casey Neistat to the stylish and produced work of Peter McKinnon.
Taking your time to research how to start a vlog? “The key is to just…start! Get comfortable in front of the camera and don’t worry about making mistakes. Your first videos aren’t going to be your best, but the more you create, the better you get. So just start,” said Siya Zarrabi, one half of Hopscotch the Globe – a travel blog based in Toronto.
In their simplest form vlogs are video blogs that are connected to the early 2000s idea of sharing your thoughts on a specific idea, story or thoughts rather than today’s idea of a blog being an overall business.
How To Start a Vlog: First Steps
At the heart of vlogging is a sense of authenticity – it’s up close and personal, focusing on the personalities involved. Content is often easy to digest, complete with a snappy narrative hook that an audience can understand quickly.
“Don’t try to be like someone else. If you want to be a successful vlogger then a huge part of that is being yourself and showcasing your personality,” said Kristen Sarah, one of Hopscotch the Globe’s co-founders. “Use the unique skills and talents you have developed to attract the right audience for your brand. Also, stop comparing yourself to others if it clouds your focus. You can’t compare two people that aren’t the same, so why bother?”
One of the easiest ways to start a vlog and get vlogging is to narrow down what you’d like to do. Are the vlogs going to be one-offs? A day in your life? Or are they going to be more thematic, covering a specific subject over a series of videos? Once you have a better idea of what content you’d like to create, you can start filming and figuring out what scenes you’d like to capture.
“Nowadays there’s so much more competition and content being created. There’s also a way bigger audience to grasp so there’s viewership for any niche you can think of. YouTube’s algorithm also rewards/punishes creators on how often they post videos and how well those videos do,” Sarah said. “After all, you might think it’s your audience watching, but really it’s YouTube’s audience. If you bring people to the site, you’re rewarded. If you send them off the site, you’re penalized. The pressure is on to make engaging content on the regular. This also causes massive burnout so be sure you’re taking your channel seriously and able to produce vlogging content on a schedule.”

Best Equipment For Vlogging
When it comes to the best equipment for vlogging, it’s a veritable buffet of cameras, mics, and accessories to choose from. You can keep it simple, and use a small camera, tripod and mic. Or to use Casey Neistat as an example again – you can use a giant DSLR with an expensive Rhode mic. The choice is yours.
Throughout our “how to start a vlog guide”, we speak with a variety of Youtubers and videographers about the best equipment for vlogging and some of the critical accessories needed to get started. We wanted to know how to get started on a budget, as well as what some of the beginner’s mistakes are and how to avoid them.
We cover everything you need to know, from what camera to buy on a budget to setting up the lighting and audio for a home studio. We’ve broken down each piece of vlogging equipment you need into its own category – while attaching a Youtuber/videographer to talk about where it comes in handy.
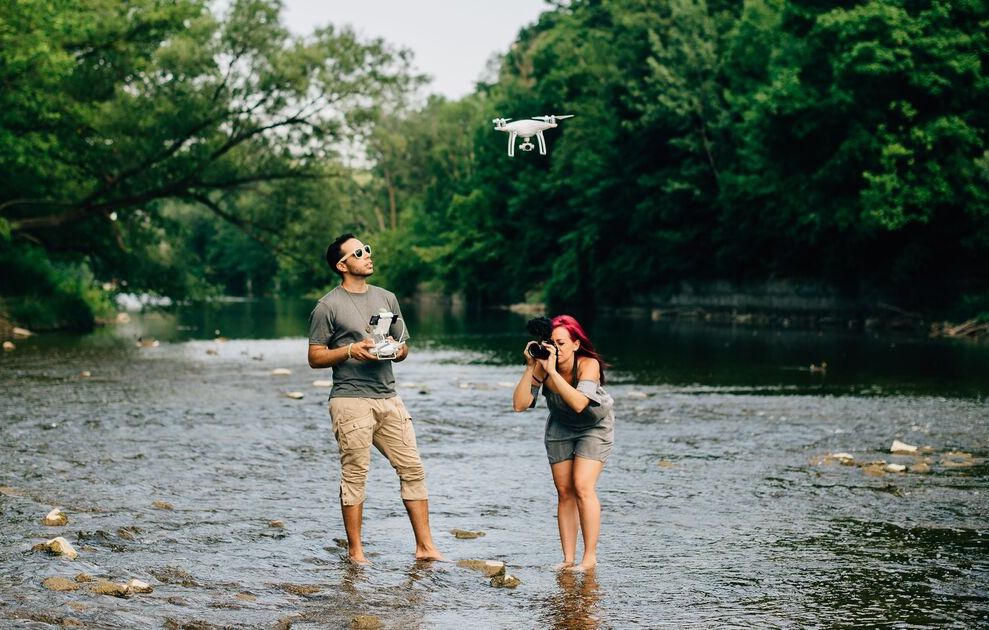
You’re going to have a ton of options with most categories so it’s important to keep in mind what you’re looking for – and if you don’t, no problem; we’ve tried to provide examples for multiple scenarios, and included a few super specific examples, like everyone’s favourite: drones, and backgrounds or props.
Camera
Best Equipment for Vlogging: Find a quality camera that works for your unique needs.
When it comes to the camera, again, the choice is both a blessing and a curse. You could use a heavy-duty DSLR sitting on a mobile tripod – but your setup could be unwieldy and not every DLSR camera comes with an LCD screen that you can manipulate.
But if you do want a bigger camera for an at-home vlogging studio set up, you can’t go wrong with something like a Canon 70D, which comes with a great articulating screen so you can yourself while you’re filming.
“The most valuable features in a vlogging camera are autofocus, as you will be aiming the camera at your face often, and surprise, surprise….the lens! If you’re aiming the camera at your face with your arm extended to the max, you need to be in the shot! A 24mm lens is the max I would go if you want your entire head and background in the frame,” said Sarah from Hopscotch the Globe.
“As you start going wider and wider (20mm, 18mm, 16mm, 12mm) more and more of the scene will be in your shot, which gives the audience more to look at when you’re speaking. If you’re in front of the magnificent Machu Picchu but your audience can only see your talking head in the shot, it won’t make for an interesting scene. Go wide or go home,” adds Sarah.
On the other hand, you have smaller digital cameras, like the Sony RX100, which provides a mobile setup with great visual clarity all in one small package perfect for vlogging.
“The Sony RX100 VII is a super-compact point-and-shoot camera with amazing features. Sometimes I can’t tell the difference between footage from this camera and the A7RII,” said Siya. “As a vlogger, the flip screen is extremely helpful. As a small camera that fits in a pocket, this one is loaded with all the high-end characteristics of a pro camera. The only disadvantage is you can’t change the lens.”
Your camera and lens selection is dependent ultimately on what you’ll be shooting – whether it’s small bite-sized travel vlogs to full a bigger production in an at-home studio, what you decide to shoot with should have the features to match your style.
Tripod
Best Equipment for Vlogging: Source a sturdy tripod to ensure quality videos.
One of the universal pieces of equipment used throughout vlogging, is the tripod. From the versatile Gorillapod to the sturdy and stationary Manfrotto, there are plenty of options to choose from.
“Read the reviews from others before purchasing your first tripod. In my case, I focused too much on price and I was disappointed in the quality of the tripod I purchased,” says Andy Baryer from Get Connected Media. “It works fine for just locked shots but I soon found out that it does not work well for any movement shots due to its inferior material builds. Had I read the reviews first, I would have likely paid a little more to get something that is more versatile,” he said.
Now with a mobile setup like the Shure MV88+, versatility is a key component. Almost everything pulls double duty – for example, Shure’s tripod is great for mobile vlogging working as an ergonomic monopod while also being able to use it as a proper tripod for those steady shots or for even recording podcasts.
“I love the fact that it is easy to set up, comes with a portable case, and the app allows me to adjust the gain before filming,” Baryer said. “Also, the headphone jack allows users to monitor the audio in real-time which is super important,” he said.
For other mobile setups, the Gorillapod is a fantastic option. Being able to bend and manipulate the legs of the tripod allows you to achieve some very interesting setups and angles for shooting on the go.
Computer
Best Equipment for Vlogging: Purchase a powerful laptop or computer to suit your editing needs.
When it comes to computers, your big-ticket options are fairly limited, it’s either Mac or PC. But within those two categories lie a lot of nuances and the ability to customize what you’re looking for.
When it comes to editing footage on the go your first thought would be to have the smallest device possible. But having a large screen and a powerful device to work with is incredibly important, especially if it’s going to double as your home studio workstation.
“We use a iMac, and made sure to upgrade the RAM and we maxed out the processor. The video card was beefed up and on the road I with earbuds and use a Samsung portable SSD hard drive to store my footage,” said Deb, one half of the travel vlog The Planet D.
“We do have a substantial set up for video editing at home. I use an iMac to edit on and a NAS system for storage of video and work at my desktop with my noise-canceling headphones,” she said. “My criteria for editing is to have a lot of room and comfort. I also need a big screen. I prefer to edit on my desktop than on my laptop.”
Another thing to keep in mind when purchasing a new laptop is to see what’s bundled in with it. Certain outlets or stores, especially when it comes to PC laptops, bundled in an Adobe subscription with the computer – which is a great way to get started with learning about Premiere Pro.
“When building a YouTube channel, you have to post regularly. It could be daily, it could be every three days, or it could be weekly. Whatever you decide, make a schedule and stick to it,” Deb says. “Your subscribers will start to know when to expect a video and look forward to it. And YouTube’s algorithm likes the fact that you are posting regularly at the same time each week.”
Film Editing Software
Best Equipment for Vlogging: Final Cut Pro makes video editing a breeze.
Video editing software comes in all shapes and sizes, but much like the laptop category, your two biggest bins fall into Final Cut Pro and Adobe Premiere Pro ecosystem. Video editing software is often looked as complicated and left to the pros, but it really is as easy as just getting started.
“It is so easy to learn with an incredibly intuitive user interface. No matter how complex the task may appear, FCPX makes it as easy as possible to make into a reality,” says Isaac Mosna from Canoopsy Media. “Besides the simplicity, the Mac optimizations that make editing and exporting smooth and fast are also a win.”
Now Final Cut Pro can seem intimidating, what with the crazy amount of options and choice to edit pretty much every aspect of the footage you capture – but it doesn’t have to be. By starting small and learning one aspect of the platform at a time, and utilizing different tutorials from Youtube or Lynda.com, you’ll be editing in no-time.
From motion graphics to simple line cuts, Final Cut Pro lets you manipulative every aspect of the video editing process.
“I first encountered FCPX in high school when I was looking to switch to an editor that could do a bit more than iMovie. I made the switch and fell in love,” Mosna says. It was super easy to learn and very intuitive. When I first started using it, it was for basic editing and titles, but now I use it for full video productions, motion graphics and everything I can imagine is possible.”
You May Also Enjoy Reading…
- Procreate Tutorial for iPad Pro: How To Draw Shoes
- Oticon Hearing Aids Review: A Guide to Oticon Opn
- Apple Nerds Hearing Clear with Oticon Bluetooth Technology
- Apple Celebrates GAAD by Hosting Accessibility Workshops Across Canada
- A Beginners Guide to Exploring Toronto From Behind the Lens
- 5 Ways to Spring Clean Your Fitness Regime with Apple Watch Nike+
- 10 Ways to Use Your Apple Watch Every Day
Lighting
Best Equipment for Vlogging: There are plenty of affordable lighting options available to ensure your’ve videos shine.
Lighting your vlogs is one of the most important things to keep in mind when deciding to begin your new tech adventure. And if you’re vlogging on the go, lighting your setup can be incredibly difficult, mainly because if you’re outside the lighting can change drastically on a moment’s notice.
“When setting up a shot, make sure the subject is well lit, but don’t drown them in the light as it I’ll blow them out and they will be overexposed,” says Luke Monastero, one half of The Monastero Twins.
But you do have a few options for lighting your vlog on the go, including using the GVM RGB LED Light that attaches to the hot shoe on your camera. It has multiple colour settings if you want to add some flare to your shots, and multiple dimmer settings if you want to brighten or dim your scene.
“This is a great light if you want to follow or track a subject. It screws right on top of a DSLR camera and you can adjust the intensity for the desired look, and it comes with colour filters as well. This light is also very inexpensive on Amazon (around $45) and is a great tool to have on the go,” Luke says.
While natural light can be unpredictable when shooting on the go, it’s also the best option for capturing scenes because…well…it’s natural light. So if you’re able to design a scene where natural is involved, that should definitely be your first course of action.
If you’re going to be shooting a vlog in a more formal studio setting – even if it’s just a small setup in your bedroom, lighting is crucial. And if the shot is cropped in on your face and you’ll be speaking into the camera for the majority of the video, you can’t go wrong with this Neewer Ring Light. Not only does it allow you to dim the lighting to your preferred settings, it features a softbox diffuser to soften the light and take away any harsh angles.
“I love that it’s a good cheap light that can really produce quite a lot of light. It’s really amazing what a great LED light can do for you. You can adjust the intensity, it comes with a stand, and a filter for a warmer tone if you like. “
Backdrops & Props
Best Equipment for Vlogging: Ensure creative props add value to your videos.
Vlogging in a studio space, or at home, will always allow for a more controlled setting which is great. And when it comes to backdrops you have two different options when it comes to the material – cloth and seamless paper.
“I find cloth photographs better because you get some natural contrast, while paper tends to look fake or show even very small crinkles or specs of dirt,” said Abbey Sharp, the owner and, personality behind Abbey’s Kitchen.
And when it comes to the colour of your backdrop, again you have a ton of choice. But the important thing to keep in mind is that if you are going with a coloured background, the choice should be intentional.
“White is a good basic option. Not only does it help brighten up food photography but it will compliment basically anything you’re shouting. We use coloured backdrops in my Rediculist series on YouTube as a way to make it clear that that’s its own series, but otherwise, we stick to neutrals for food.”
An important trick for backgrounds on the go is having a background darker than your subject. This creates a natural contrast that allows your subject to pop off-screen. It also makes editing your footage in post much easier to do – you don’t need to artificially create a contrasty look because you did it in-camera.
Now when it comes to props, Abbey suggests staying away from fresh flowers as you have to replace them frequently. Plants and succulents are always a great option, and having objects of personal significance is always a great way to go.
“Our props include cookbooks and mason jars with spices and pulses. When a specific holiday comes around, we add a few seasonal pieces like pumpkins or gourds for Halloween, greenery for winter or holidays and pink and red hearts for Valentine’s Day,” Abbey says. “A lot of this we bought at IKEA or the Dollar store, so there’s no need to break the bank.”
Microphone
Best Equipment for Vlogging: Ensure your Youtube audience can hear what you’re saying by investing in a top notch microphone.
Having a quality microphone is super important when it comes to vlogging – you want people to hear you clearly after all. For beginners, Canadian actor and YouTuber Owen Roth recommends the Movo VXR10.
“For anyone new to vlogging looking for quality sound on a budget, I would recommend the Movo VXR10. It’s a great little mic that packs a lot of punch and even comes with a little windscreen for outdoor use. It can plug directly into your camera or phone, and for under $60 Canadian, really can’t be beaten,” Owen said.
And while Owen hasn’t used the Shure88+ yet, he does think that the inclusion and style of the Manfrotto mini tripod that comes with the video kit is fantastic.
Speaking of the Shure88+, the kit comes with a fantastic microphone for shooting vlogs when out and about. And what’s so great about its mobile set up is that everything is compatible with your phone. There’s a grip that holds your phone in place, while the microphone sits right on top. The other thing that’s great about the Shure88+ plus, is the fact that it comes with a windshield, which, as Owen points out, is super useful in less than ideal weather conditions.
“Use a windshield on your mic on a windy day outdoors, but remember it will soften your audio! Only use the windshield when you absolutely need to. I found out the hard way that using a windshield will lower the volume of your recorded audio drastically,” Owen says.
Adobe Rush
Best Equipment for Vlogging: Adobe Rush makes video editing on the go a breeze.
In the last few years, Adobe has made significant strides with its mobile photo and video editing apps. For still photography, the Lightroom mobile app is fantastic and for video editing on the fly Adobe Rush is the way to go – and it comes complete with an entire walkthrough the first time you use it.
“The great thing about Adobe Premiere Rush is that there is a tour built right into the app. The tour takes you through each step of the program and how it works and even provides pre-shot footage for you to play around with and edit yourself,” says travel blogger and YouTuber Cailin O’Neil. “The Adobe Creative Cloud channel also offers great tutorials. It is a pretty basic, user-friendly and intuitive editor and new users should be able to get the hang of it fairly quickly,” Cailin says.
The other thing that’s great about the Adobe Rush app is that it lets you record video within the app itself, so the entire ecosystem is a closed-loop and gives you a ton of control over not just the editing process but actually filming your vlogs as well.
“One of the coolest things about the Rush mobile app is that not only can you edit on the go but you can also film and capture right in the app as well. It will let you film multiple clips and that instantly imports them into your project,” Cailin says.
On top of that, because Adobe switched to a Cloud-based system, once your footage is uploaded to Rush, what you’ve captured is now accessible from any device signed into your Adobe account.
“It syncs on the Adobe cloud so all of your devices that have the app see the same edit at the same time. Because of this, you can easily go from editing on your laptop to your phone and back all with the same edit,” Cailin says. “This is great for editing on the go on your phone then doing more of a fine-tune edit on a larger screen with your computer when you get home,” she says.
Drones
Best Equipment for Vlogging: Capture jaw-dropping scenes by investing in drone technology.
Drones are one of the more complicated pieces of tech to use when it comes to vlogging. From both a practical perspective when it comes to applying for a Drone license and from a creative and technical one; drones aren’t easy to fly.
“Use your tools and get the most out of the functionality of your drone. For example, using Active Track is a great setting to use to get creative angles of your subject interacting with the environment,” said Kristin of VacationCouple, a travel vlog and website she runs with her partner Shadi. “And using the hyper-lapse setting can give you some epic cinematic drone time lapses.”
For the longest time, there were no real restrictions or training necessary to use a drone, which meant a lot of people were flying into objects and people. Eventually, certain laws were put in place regarding drones, and each municipality has bylaws that you should look up before using it.
“A good general rule to keep in mind is also a simple one, always be courteous. Don’t fly too close to people or near airports. And you should always have the drone in your line of sight and no more than 120 m high,” Kristin says.
When it comes to purchasing a drone, you can’t go wrong with the Mavick series of drones, which have a pretty decent lineup that varies in price. On the cheaper end that still provides great quality, the Mavick Mini is a great option.
“In our opinion, the new Mavick Mini is a great budget-friendly drone at less than $500. It’s portable, easy to fly, and at under 250g, it avoids the limits that many drone restricted areas put on heavier drones, which opens up the shooting possibilities” Kirstin says.
But if budget isn’t a concern, then Kirstin and Shadi recommend the Mavick Pro, with its great image and video quality, handling, battery life and overall performance it’s pretty outstanding.
Royalty-Free Music
Best Equipment for Vlogging: Featuring fun music in your videos doesn’t have to break the bank.
High-quality royalty-free music can be incredibly difficult to find if you don’t pay for it. And while it might seem easy to just rip your favourite song from Youtube or whatever other platforms you use, it’s a gigantic no-no, and will probably land you in hot water when it comes to copyright strikes. And when it comes to Youtube, agetting hit with three copyright strikes and your account can be permanently deleted.
But thankfully there are a ton of different options that are relatively cheap – or hey, you could always create your own. Services like APM Music or Epidemic Sound offer a great curated service that allows you to search for music by genre, category, theme and a ton of other options as well.
“I try to keep a similar vibe in the music we use and you can search for similar sounding music from other songs you’ve used. Also, they have curated lists for different niches that allow you to explore. The site makes it very easy to find what you are looking for – whether you know what that is or not,” says Youtuber Kim Yuhl from Kim & Way.”
Finding the perfect song for your video can be difficult, and one great way to figure out what music you want is to ask yourself “What am I trying to say or capture?” in each section of the video. If there are different thematic sections of your video then it’s a good idea to have different musical cues spread throughout.
“My biggest advice is to not overthink it. It is easy to spend hours looking for the perfect song. Have an idea of what you are looking for and try to match the vibe of the video. Music should help tell the story and complement the overall video. If it is too distracting, you will lose people,” Kim says.
GoPro
Best Equipment for Vlogging: GoPro offers a great opportunity to shoot underwater videos.
Using a GoPro or underwater camera are two great options for vlogging on the go. In recent years, GoPro has made steps to take their miniature camera from something you use for capturing footage of extreme sports, to a bonafide fantastic camera that can pretty much do everything you need it to. From producing its own wi-fi and allowing you to control the device from your phone to its 4k filming quality, the GoPro Hero5 is a fantastic little package.
“Personally, a GoPro was one of the first cameras I had to capture my vacations, as well as adventures,” said travel blogger Ryan Woods from Out With Ryan. “The GoPro system is one of the easiest systems to use as you can easily take a photo, a video, or even a time-lapse using the camera’s screen or the GoPro App on your phone. GoPros produce their own wifi that you can connect with your smartphone to control the camera from 35-50 feet away depending on the wireless interference in your area,” he said.
The best aspect of the GoPro system is its versatility – being waterproof and durable as all hell, you should definitely go swimming and try to capture some underwater footage, or why not attach it to the hood of your car while your driving through the mountains? Its small size and the fact that you can attach it to a helmet or chest mount gives you the ability to share your POV in a way that’s truly unique to GoPro. And that’s what vlogging is all about right? Sharing your personal interactions, travels, and activities with an audience you’ve cultivated.
“Compared to a traditional DSLR or point and shoot, the GoPro has been one of the smallest, and lightest 4K cameras on the market. Not only can you fit a GoPro discreetly into a pocket, but it’s also the most durable camera I’ve ever owned,” Ryan said. “With a GoPro, you have the ability to strap the small camera to your body, a selfie stick or the hood of your car with ease. I’ve damaged my GoPro so many times and it still works, unlike when I dropped my DSLR or Point and shoot; GoPros are extremely resistant.”
The other fantastic aspect of the GoPro systems is all of the add-ons and attachments that you can use it with. Ryan suggests picking up a selfie stick “So you can not only capture the best group selfies, but you can also extend the pole to capture video from high above or even shots from behind.” On top of that one of the most underutilized features of the GoPro that’s an inherent part of vlogging is a time-lapse feature that is great for creating interesting b-roll.
Some of the links in this story use affiliate links. This means that if you make a purchase through our site, dobbernationLOVES will earn a small commission at no extra cost to you. Your support helps us to produce comprehensive content.
Great article!
Thanks for sharing!