Looking to learn how to draw tomatoes?
This easy Procreate tutorial is here to help! Read along for a simple yet comprehensive step-by-step guide on how to draw a realistic tomato digitally using iPad Pro.
Digital drawing continues to thrive as an exciting medium in the world of art. Many famous illustrators have created truly remarkable work using Procreate on iPad Pro, and now it’s your turn to try out the amazing tools this artistic medium has to offer.
This realistic tomato drawing Procreate tutorial will break down the process of illustrating on a tablet and set you up with the basics of this amazing app. We’ll use how to draw tomatoes and a tomato slice as our example!
How to Draw Tomatoes on iPad
I’m a Toronto illustrator who specializes in book illustration, portraiture, editorial illustration and exhibition design. Over the last few years the digital medium has become an important drawing tool for me and a integral part of my illustration process overall.
If you are new to digital drawing I am sure you’ll be amazed, both by how easy it is to pick it up, and by the new range of drawing potential it provides. Creating illustrations of everyday things around your home, like a tomato, with an Apple Pencil on iPad Pro, allows for new and advantageous ways of creating layers, texture, and dimension, and is also really quite fun.

Sketch A Tomato Drawing In The Kitchen
One of the best ways to become an expert on how to draw a tomato is by visiting your local grocery store. At my favourite specialty produce market in Toronto they sell a variety or tomatoes, from juicy beefsteak, colourful heirlooms, plump roma and petite capri, cherry and grape varieties.
The species originated in western Latin America. Its domestication and use as a cultivated food may have originated with the indigenous peoples of Mexico. The Aztecs used tomatoes in their cooking at the time of the Spanish conquest of the Aztec Empire, and after the Spanish encountered the tomato for the first time after their contact with the Aztecs, they brought the plant to Europe, in a widespread transfer of plants known as the columbian exchange. From there, the tomato was introduced to other parts of the European-colonized world during the 16th century.
Tomatoes are a significant source of umami flavor. The tomato is consumed in diverse ways, raw or cooked, in many dishes, sauces, salads, and drinks. While tomatoes are fruits—botanically classified as berries—they are commonly used as a vegetable ingredient. In some parts of the world like Korea, they can be found decorating the top of a cake where they are enjoyed as a sweet fruit.
We suggest purchasing a variety of tomatoes for your drawing. A diversity of colours, shapes and textures helps make a still life vegetable portrait more interesting. Be sure to arrange the tomatoes on your kitchen counter to photograph in ample natural light.
You’ll of course need to eat up those tomatoes once you’re finished drawing so why not cook one of our favourite tomato recipes like Sartu Di Riso Italian Baked Risotto, Maccheroni al Ferretto Pasta with Beef Ragu, Garides Saganaki Sizzling Greek Feta Shrimp, Easy Caprese Gnocchi Cheese Bake Casserole, Vegan One Pot Indian Thakkali Tomato Biryani, Burrata Bruschetta Crostini with Tomato Chutney, Culurgiones Sardinian Cheese & Potato Stuffed Pasta, Egyptian Salad Vegan Salata Baladi and Healthy Vegan Tomato Chutney For Dosa.

Tomato Drawing Procreate Tutorial
Tomatoes, the South American nightshade that took the world by storm. This flavourful and juicy fruit is one of the most widely cultivated in the world. They are also great subject matter for still life drawing. Still life drawing utilizes non-living, everyday objects that are good at holding still as subjects to practice drawing techniques like light and shadow, colour, shape and texture. And an a tomato is a brilliant subject!
Brilliant red, shiny, smooth, and with an entire universe of textures, fibres and juices on the inside that glow and catch the light in the room. A tomato is beautiful to look at and also a fun challenge in texture and light for drawing.
Luckily for you Procreate makes recreating these telltale tomato features in your drawing fun and easy. And this procreate tutorial on how to draw tomatoes will break down the process into separate steps that will have you creating still life tomato masterpieces in no time.
Not to mention, the Procreate methods you’ll practice using in this tutorial will create the benefit of adding many exciting new tools to your art arsenal!

How to Draw A Tomato with iPad Pro
Let’s first get set up with a new canvas in Procreate. When you first open the app you’ll be in the “gallery” where all of your artworks will be visible. Tap the “+” in the top right of the screen and a menu will appear where you can select your canvas size.
To choose your dimensions click “create custom canvas” and enter them (in mm, cm, inches, or pixels). You can simply select “screen size,” however I recommend going bigger so that you have the option to print your finished piece with a nice resolution.
For my tomatoes drawing I’ve created an 11″ x 14″ canvas at a resolution of 300. The larger the canvas size and resolution the fewer layers you can have in your artwork, so just keep that in mind.
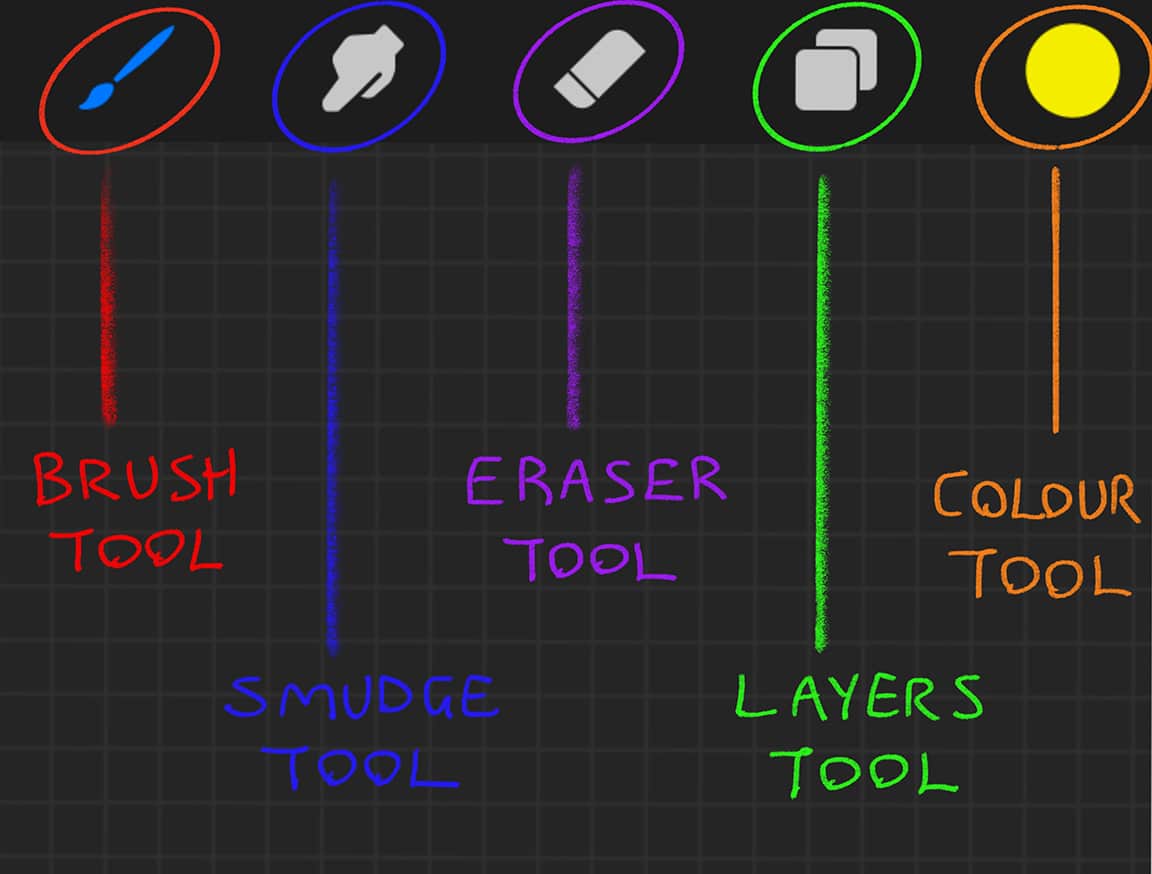
Now it’s important to explore and familiarize yourself with Procreate’s basic tools. Starting with the toolbar on the top right of your canvas.
- The Brush Tool: This is the tool with which you draw/paint. Tap it to open your Brush Library. Procreate’s brushes are categorized in a list down the left side of the drop down menu. Tap any of these to see your brush options in each category. Choose what you like and then tap the brush icon in the toolbar again to close the menu. Now get scribbling! Try a few different brushes and use different pressures and angles of the Apple Pencil – it’s remarkably realistic in its response to your hand.
- The Eraser Tool: It does exactly what you think it does! Tap it and you’ll open an identical Brush Library as tapping the brush tool. Try a few and see how it erases your scribbles.
- The Colour Tool: This is your colour palette. Tap and it will open in its default view of “Disc.” Use the outer wheel to select colour, and the inner circle to select lightness/darkness. Or you can use the square view that combines the two. When you’ve chosen the colour you want to use, tap the colour icon in the toolbar again to close the menu. Again, do some scribbling! Choose a variety of brush and colour combinations to get a feel for the colouring process.
- The Smudge Tool: This is used to blend colours and create gradients. This tool has the same effect as taking your finger to pencil on paper and rubbing it to blend. The smudge tool mimics the real thing fairly well but it does take some getting used to.
- The Layers Tool: You can use this menu to create multiple layers on your canvas, and select between them. How to do this, and the benefits of layers, will be best understood by following through my own example here in this Procreate tutorial.

Then there are the slider toolbars on the left side of your canvas.
- Brush Size: The top slider. Tap, hold and move up and down to adjust the size of your brush tip. A preview window will open up to help guide you. This slider is used for your brush, smudge and eraser tools in the same way.
- Brush Opacity: The bottom slider. This works the same way as the brush size slider, but is for brush opacity.
- Undo/Redo: Under the sliders you’ll see these two buttons. Tapping the undo button will undo the last stroke you drew/erased. Vice versa with the redo button. This is a very useful tool you’ll probably use a lot. You can also undo by tapping once anywhere on your canvas with two fingers.
There is also the toolbar in the top left of your canvas. For these tools I will point them out and explain them along the way as we need them.

How to Draw Tomatoes Step One: Choosing a Reference Photo
If you can take your reference photo yourself, great. You can use the iPad itself to capture a good photo. If you don’t have any tomatoes handy, there are plenty of images online for you to choose from. It’s a good idea to chose one that is copyright free and there are several websites that have large libraries of free images, like pixabay or upsplash.
I took my reference image myself in my kitchen. I included one whole tomato with some vine still attached, to capture the exterior, one tomato that I cut in half for a full cross section, and one tomato wedge, just for a bit of variation. I arranged them in a spot where they were well-lit and that I could take a nice clear photo that captured the glistening quality of the juice.

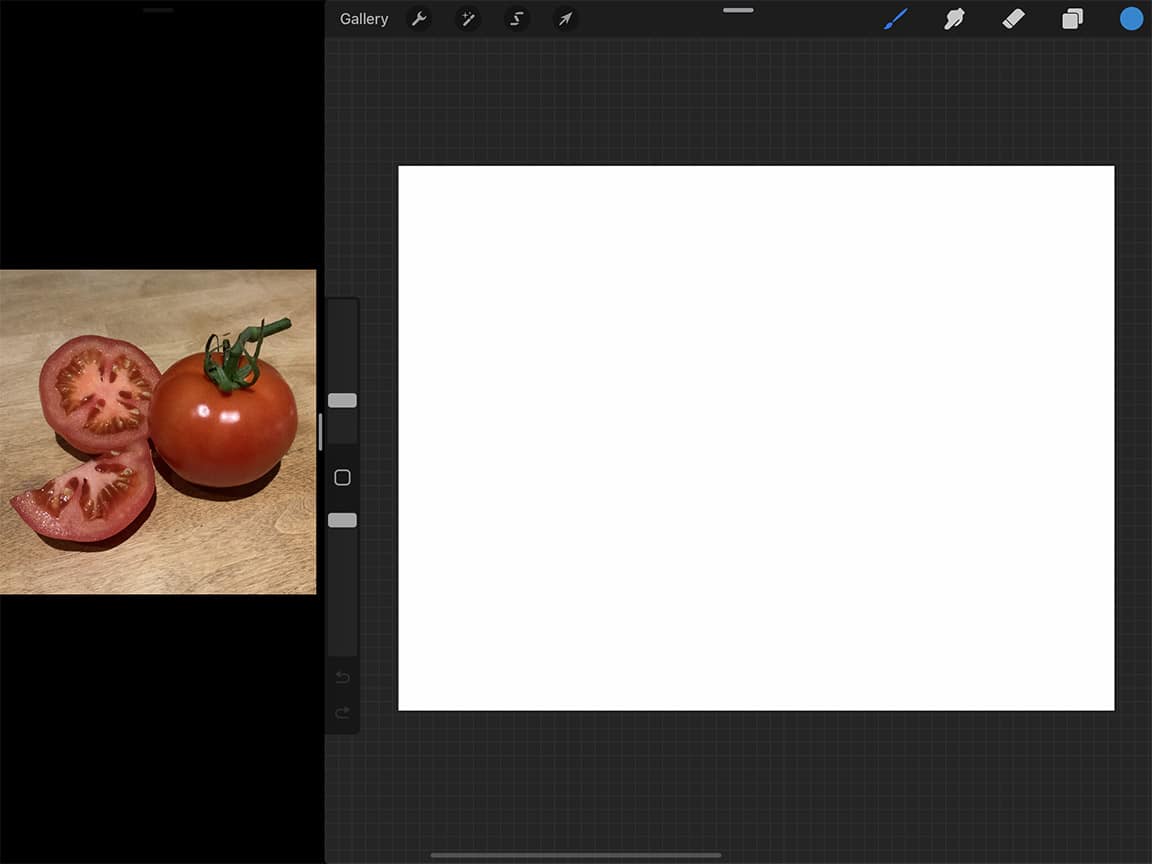
The first thing to do before you get to drawing is setting up your reference photo to work from. A great option with iPad Pro is that you can keep your photo open in a window beside your Procreate canvas while you work.
To do so, tap and hold the bar at the bottom centre of the screen in Procreate, then slowly pull up the iPad menu (if you swipe too quickly you’ll close Procreate).
Once the menu is up, tap and hold the photos icon, and drag it to the left side of the screen (or right side, for the lefties out there!) Pull it past the edge of the Procreate window and drop it there and tada, you have both open at the same time. You can also adjust the size of the photo window by holding and sliding the side bar of the window.
How to Draw Tomatoes Step Two: Rough Sketch
Now you are set up to start drawing tomatoes!
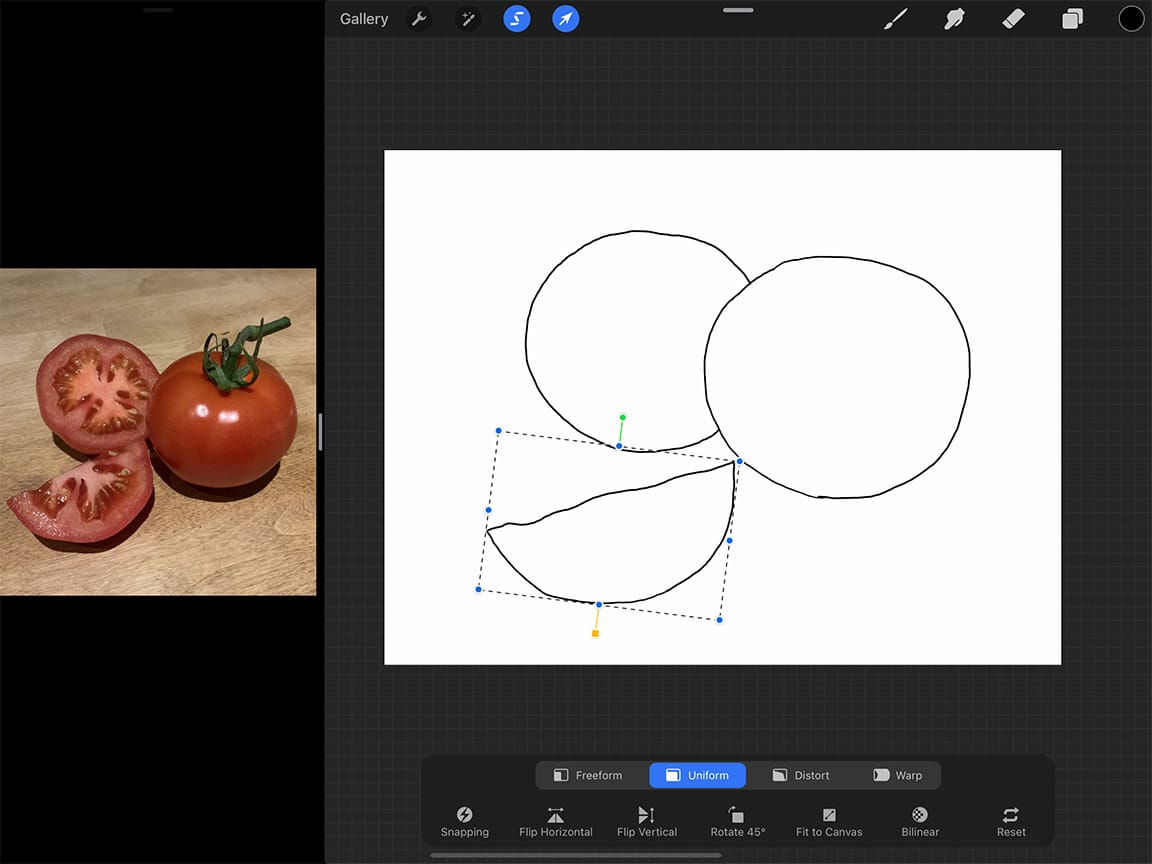
The first step is to do a rough sketch of your drawing as a guide for colouring it in. For this outline I used the technical pen brush under “inking” in the brush menu, because it gives a nice clean line. Your sketch does not need to be perfect by any means. However it is meant to be a drawing guide to work from, so take your time and adjust until you get the proportions and placement of all the features where you want them.
You can adjust the size and position of different elements in your guide drawing by utilizing the “lasso” tool. That is the tool in the top left menu that looks like the letter “S”. Tap it, and then make sure “freehand” is highlighted in the bottom menu. Then you can use your Apple Pencil to draw around the part you want to adjust. For example, I wanted the tomato wedge to be slightly samller, closer to the centre, and tilted a bit further. One you’ve traced around the element you want to adjust, tap the cursor tool in the top left menu and you’ll see a bounding box appear which you can use to make those adjustments.
Later, once you’ve finished using your guide you can take it out of view by turning off its visibility in the layers menu. Just unclick the checkbox on the layer in its drop down menu (third tool from left in the top right menu).
How to Draw Tomatoes Step Three: Blocking Out your Shapes
The next step will be blocking out the shapes of the tomato and tomato pieces with a solid colour. You’ll do this on a new layer. To create a new layer tap the “layers” icon in the top right menu and then tap the “+”. Next tap, hold and drag the new layer underneath the sketch layer in the drop down. This way you’ll still see you sketch layer overtop of it as a guide.
Now you are going to trace out the outline of your tomato shapes, and then fill that outline with a colour. I chose the “studio pen” tool from the inking menu for this stage because it is thick and has that nice smooth edge. To determine which colour to use, I took a look at my tomato reference photo and tried to match it generally to the “average” colour tone of the pieces. Now using your sketch as a guide, trace the shape of the tomato until you have a fully enclosed shape. Then tap and hold the colour icon in the top right again to pull and “fill” the shape with that colour.
I created each of these colour-blocked shapes on its own separate layer. This will make editing each portion possible without interfering with the other pieces.

How to Draw Tomatoes Step Four: Underlying Gradients
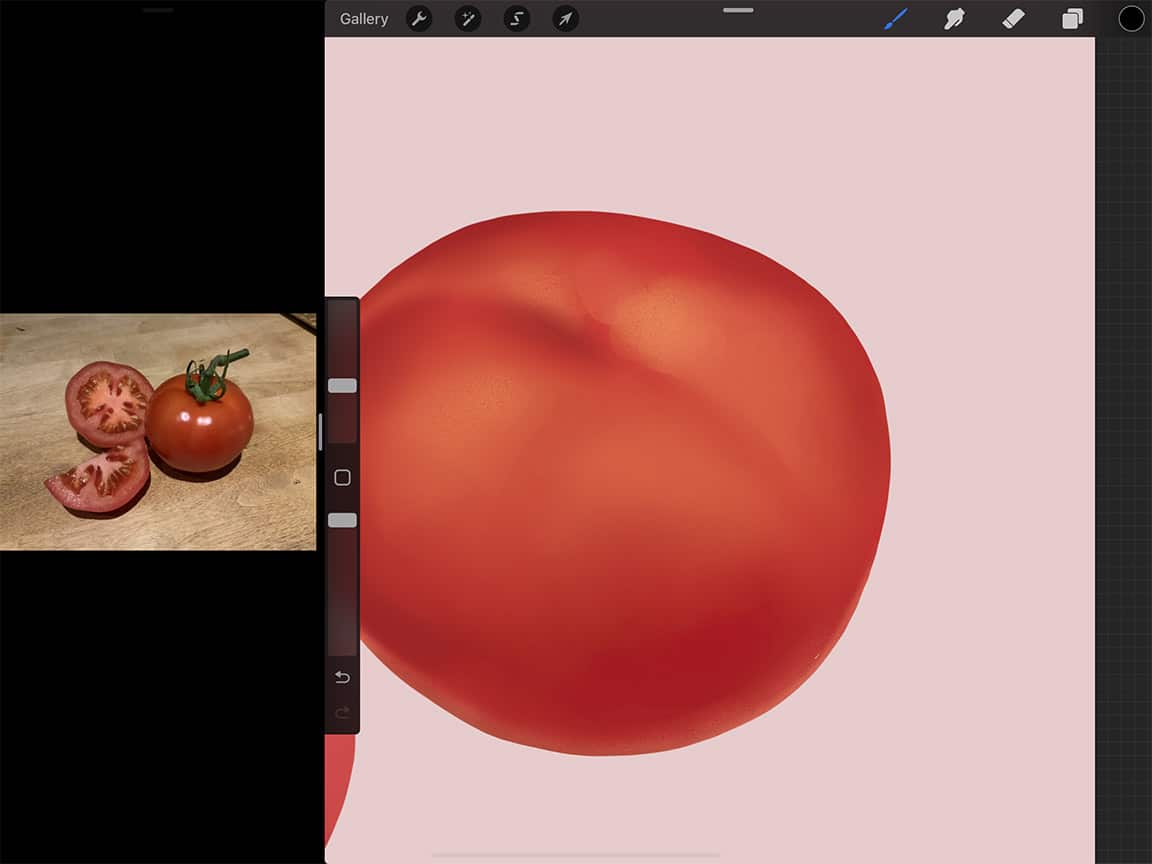
Now that you have your base layers of colour you can start “painting” and adding layers of colour to build up the texture and details of your tomatoes. Take a good look at your reference photo and try to see the underlying gradients of light and dark tones beneath all of the finer details.
I started first with the complete tomato.
For this part you do not necessarily need to be very tidy with your painting. You can roughly paint out lighter and darker areas and then blend and smooth them out using the smudge tool. For this part I chose the “round brush” under “painting” in the brush menu, because Tomato skin has a mostly smooth underlying quality to it. Play around with it until you have a gradient that recreates the general changes in tone from light to dark across the exterior of the skin. I next enhanced them using the “Noise” brush under “Materials” in the brush menu. The fine flecked quality of this brush matched the fine flecks on tomato skin that you can see when you observe it very closely.
Remember you can always undo any stroke you take by tapping two fingers anywhere on the screen.

Procreate has a feature that makes this blending part a lot easier, called the alpha lock. If you “alpha lock” a layer, you can only paint on what already exists on that layer. Meaning when blending out some colours you don’t need to worry about your smudges coming past the edges of you blocked out shape.
To alpha lock a layer, open the layers menu. Using two fingers, swipe the layer you want to lock to the right. If you’ve done it successfully the layer thumbnail will get a checkered background. To un-lock the layer at any point simply swipe it with two fingers to the right again.
How to Draw Tomatoes Step Five: Tomato Stem
To create your tomato stem, start by creating a new layer for them. Then you can block out the total shape of the stem and the leaves in green. Once you have that shape drawn and filled in you can begin editing it to define all of the components. This is where it is helpful to zoom in and take a good look at the variations in tones and separation of details.
For this part it is really helpful to utilize another great Procreate drawing method – the lasso tool. You can use this tool to isolate specific areas with a layer to draw on. Tap on the icon in the top left menu that looks like the “S,” then trace around the area you want to draw, For example just the stem or one of the leaves. Once you’ve completed outlining your area, next tap the brush tool. Everything not selected on your canvas will be blocked out with a striped pattern temporarily. You can paint freely in your selected area without affecting what else surrounds it. This can be a very helpful way to create those defined leaves faster and more easily.
Feel free to experiment with different brush tips for different effects here too. And blend where you need to using the smudge tool.

How to Draw Tomatoes Step Six: Highlights and Lowlights
To finish off the complete tomato, add your bright highlights, as well as shadows. From my reference photo this meant the two very bright points of light shining off the skin, as well as the shadow the stem and leaves create.
For the bright highlights I find it helpful to do those on a separate layer, just so that any blending doesn’t affect the skin I’ve created underneath.

How to Draw Tomatoes Step Seven: Tomato Cross Section and Slice
Now it’s time to repeat this process for the other tomato pieces. For these the process is slightly different given the new textures of the interior of the tomato.
The first step here is to block out the area of the “wall” of the tomato, so that parts that run along the edge, and that move into the centre where the seeds are. Again, do this on a separate layer. I determined this just based on how my reference photo looked and where there was sharp definition between elements or not. It may be different in your reference.

Once you’ve blocked that shape out, put the alpha lock on that layer, as well as the layer underneath it with the full cross section and wedge shape. Now you can switch between both of those layers and paint away to your heart’s content. This part probably look the longest for me because there is so much detail on the inside of a tomato compared to the outside. Take your time observing the subtle details and changes in colour and do your best to recreate them.
For a lot of the juicy areas I used the round brush under “Painting,” and did a lot of blending using the smudge tool. Just because those very wet areas have quite a smooth appearance. For the firmer, fleshier parts I noticed they have almost a gritty texture, and so the “Noise” brush was again helpful here.
Keep in mind you can also play around with the brush size and brush opacity on the left side menu to hep you with subtle variations in colour.
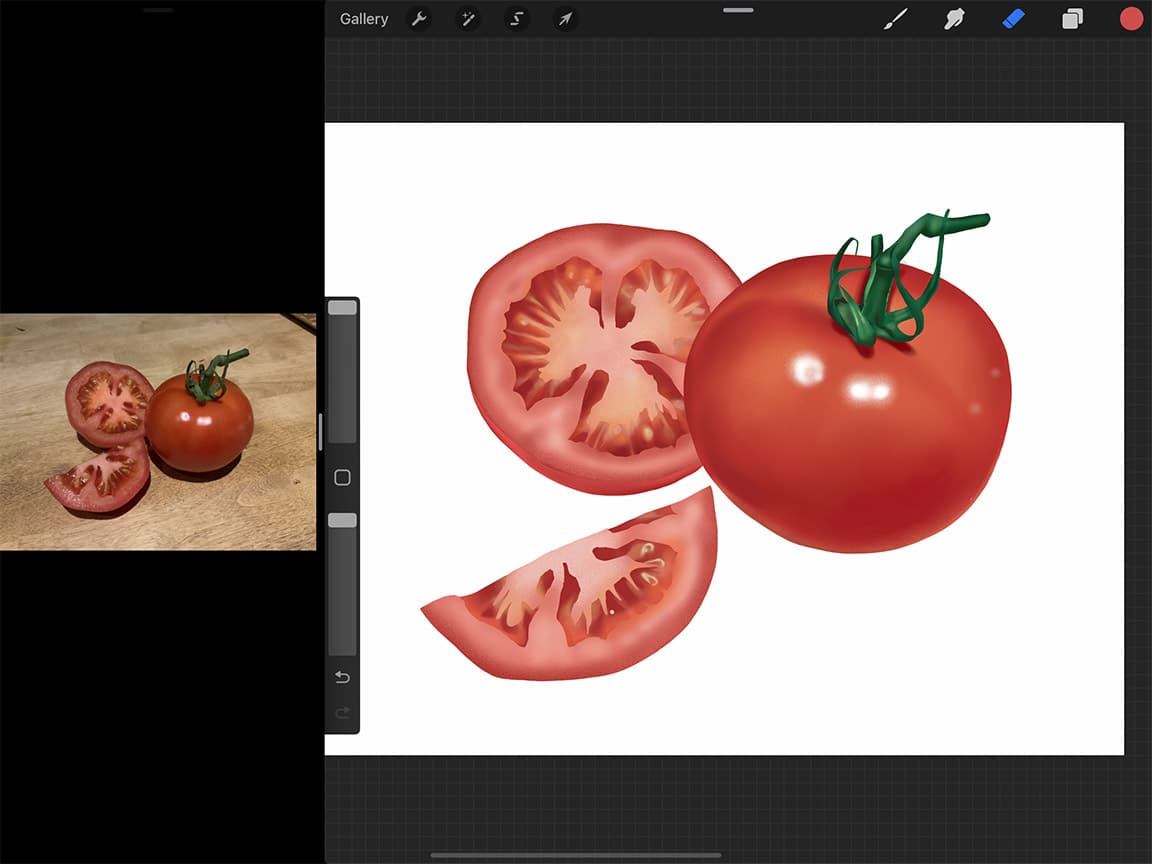
After you have all of the interior details to your liking, go ahead and add the bright highlights like you did for the complete tomato. Use a separate layer to add the bright white highlighting that creates the juicy effect. For this I started with the “Flicks” brush under “Spraypaints” just because there are so many tiny dots of reflected light along the fleshy part of the tomato. I then did a round of larger single points of reflection using the technical pen tool. One tip here I have is to not only use pure white for these reflections, if you have some variation in the brightness you will get a more realistic effect.

Finally, to finish everything off I added some shadows to ground the tomatoes. For these once again start on a new layer positioned below the tomato layers. Draw out your shadow shapes with a clean-edged brush (like the technical pen) and fill them in with a dark, nearly black colour. Then you can use the layer’s opacity to make them slightly transparent to let the texture of the cutting board come through.
To do so, open the layers menu, then tap the “N” on the shadow layer. Then you can adjust the slider to the transparency of your liking. For my shadows I also adjusted the opacity of the eraser tool (the slider on the left side of your screen) and took out a bit more in certain places to help the shadows better match the reference photo.
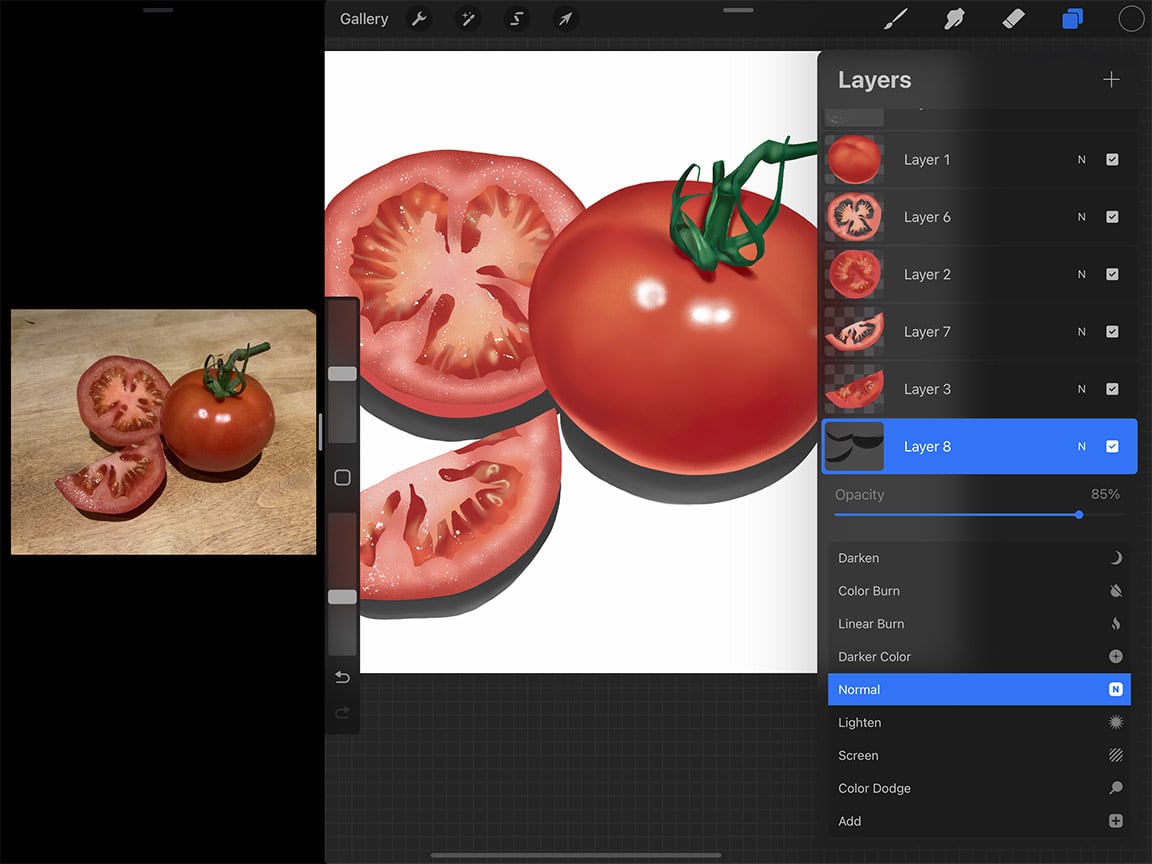
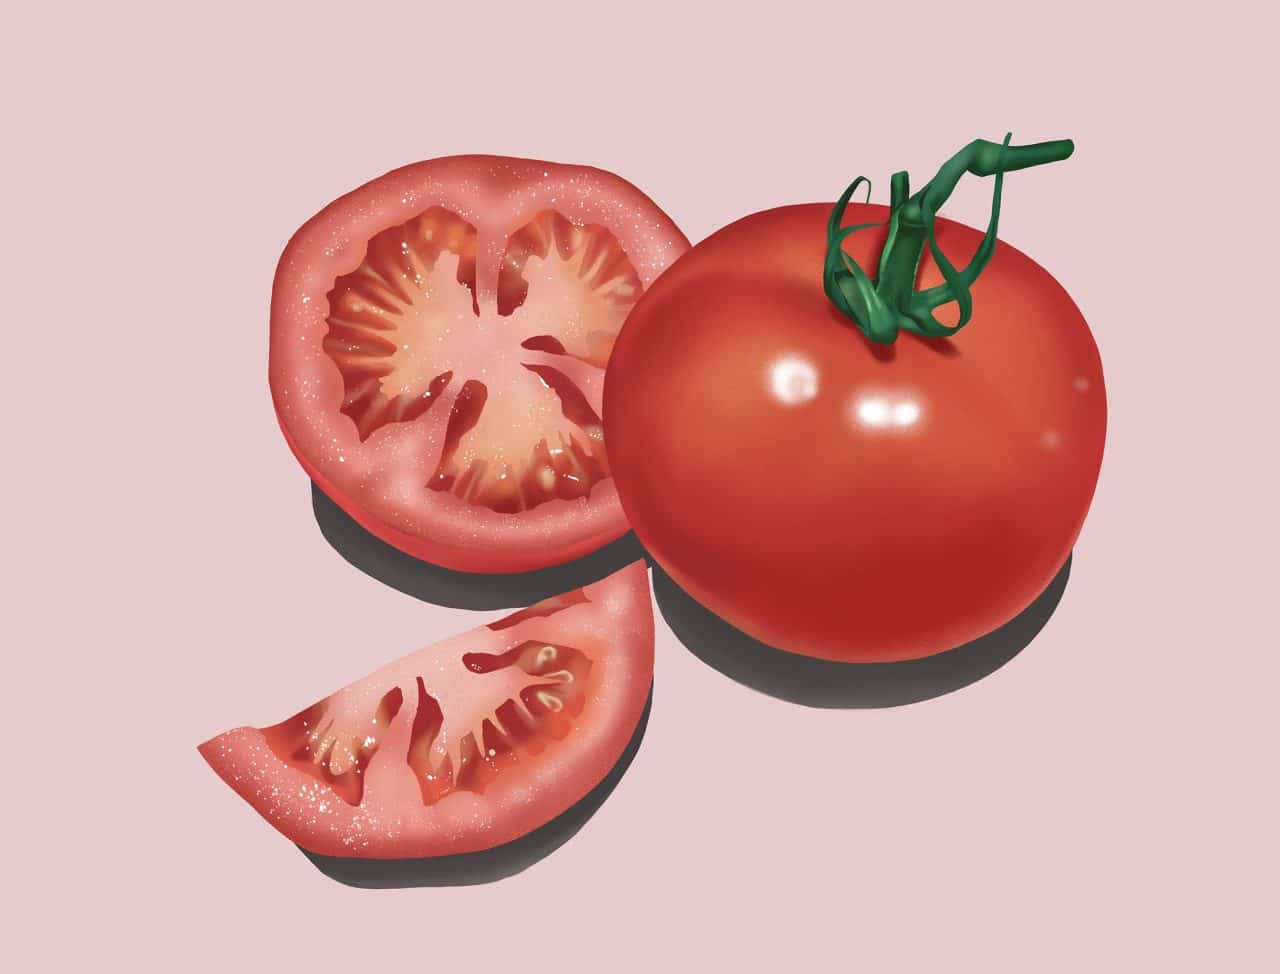
The last detail was choosing a background colour. You can do so by opening the layers menu and tapping the “background colour” layer. I chose a muted pink, because who says red and pink clash? Any number of colours would also look great with your bright red tomato, so choose whatever you like!
Remember if ever you want to undo a certain stroke, just tap the screen once with two fingers. You can go back as many strokes as you like this way, Procreate remembers everything!
Helpful Tips
- To return to a colour you’ve already used, tap with one finger on the area with the colour you want to reselect, and hold. A magnifying circle will pop up and you can move that to the exact colour spot you want. Lift your finger and it will select that colour for your brush.
- You can zoom in and out by “pinching” the screen with two fingers. Don’t forget you can zoom in for areas with small details. You can also rotate the canvas using the two-finger pinch (rather than turning the iPad itself around, an inevitable habit when you’re used to turning your piece of paper around – there is an easier way!)
- Making corrections – After you have finished a detail in your illustration, you may realize that it’s perhaps not quite the right shape, or the proportions were a little off. An amazing feature of Procreate is that rather than erasing and drawing it again (a lot of work!) you can instead isolate a portion of the drawing and stretch it. To do this, you can use the lasso tool again to trace around the area you want to stretch. Once you’ve done that, tap the cursor icon (the fourth icon in the menu at the top left of your screen). This will create a bounding box around the area you want to manipulate. From there you can stretch the area how you like using the pull points. Once you have it where you want it tap the cursor icon again.
You May Also Enjoy Reading…
- How To Draw an Orange
- How To Draw Potatoes
- How To Draw Fish
- How To Draw Mountains
- How To Draw A Cottage
- How To Draw A Bottle
- How To Draw Shoes
- How To Draw Realistic Animals
- How To Start a Vlog: Purchase the Best Equipment for Vlogging
You’ve Completed our Realistic Tomato Drawing Tutorial!
You’ve now mastered how to draw tomatoes!
If you’re someone who draws or paints a lot, you know it’s possible to keep going and going and tweaking and tweaking into eternity. And truthfully Procreate makes falling into this even easier. The up side, however, is that you can leave the piece alone for a time, and then very easily pick up where you left off, without having to get all of your paint and supplies out.
All that said, you will know when it’s done. And for a satisfying finish to your digital drawing experience, you can utilize one of my favourite Procreate features – timelapse video. By default, Procreate records your entire drawing process (you can opt to turn this off, but really why?) You can play it all back in high speed when your drawing is complete. It’s a fun thing to watch and a fantastic thing to share with curious fans of your art. If you’re a freelance illustrator, find that offering a timelapse video of your clients’ work acts as a competitive advantage. And better yet, offering a video that showcases the creation of your tomato drawing requires no additional time or money.
I’m sure you’ll be satisfied by this Procreate tutorial as your step-by-step drawing guide for how to draw tomatoes. Once you’ve gone through the motions from start to finish you can experiment and settle into your own process. This medium has so many possibilities that you can really let your creativity run wild. So dive in, go digital and have fun!
Best Illustration Apps
This story offers a step-by-step Procreate tutorial on how to draw tomatoes. It’s important to note that there are several other drawing apps you can use on iPad Pro when drawing tomatoes. Here are just a few:
- Notes: The Apple sketch app that comes with your iPad! Simple, easy to use for quick sketches, free and fast. Though for serious drawing you may want to seek apps with more robust options/tools. Price: FREE
- Adobe Illustrator Draw: This app is for creating vector graphics, with a very intuitive interface. It can also sync with Adobe’s Creative Cloud, meaning you can transfer your work between the iPad and desktop no problem. Price: FREE with Creative Cloud subscription, monthly plan prices vary.
- Inspire: Fast and nicely responsive, with a huge variety of customizable tools, and over 80 brushes. Great for beginners and intermediates alike. Price:$13.99 CAD, $27.99 for Pro Version.
- Procreate: Easily one of the most popular drawing apps, it works seamlessly with Apple Pencil, is highly responsive and offers an excellent variety of tools, all presented in a terrifically simple interface. Price: $13.99 CAD
If you’re a newbie digital illustrator we also suggest purchasing Beginners Guide to Digital Painting in Procreate, iPad and iPad Pro for Dummies, a protective iPad cover and Apple Pencil Case.
Procreate Tutorial: The Benefits of iPad Pro
- The process is very similar to drawing using traditional methods on paper. You’ll be delighted by how intuitive it is, and how for the actual drawing part, you don’t need to re-learn anything.
- Streamlined process. All of your supplies – camera, reference photos, paper, pens, pencils, eraser, pencil sharpener, paint and paint brushes, are all combined into one place – iPad Pro and the Apple Pencil.
- The ability to undo when your pen stroke wasn’t quite right. You can also edit certain elements after the fact. The thickness of that piece is too much, I don’t quite like the colour I used here. All of that can be fixed!
- The ability to work in layers, drawing or colouring over or under certain elements without worrying about accidental erasing or colour contamination.
- You aren’t tethered to your desk, you can get comfy and work wherever you like. And that includes outside your own home too.
- Easy transferability/shareability of your art. Your finished product is already in a format that you can add to your illustration portfolio online, share on your social media, etc. No need to arrange a high quality scan or professional photograph.
- The ability to replicate elements, (for patterning, for example) rather than needing to hand-draw the same thing over and over.
If you’re a freelance illustrator looking to up your game, getting familiar with this medium will benefit you tremendously. And if you are an amateur who just loves to draw, looking to have fun creating tomatoes or other still life drawings, iPad Pro and Apple Pencil can help you do things you might not have thought possible.
Some of the links in this story use affiliate links. This means that if you make a purchase through our site, Dobbernationloves will earn a small commission at no extra cost to you. Your support helps us to produce comprehensive content.
