Thinking about giving digital drawing a try? Our step-by-step Procreate tutorial will show you how to draw realistic animals.
Whether you’re a freelance illustrator, or beginner learning to sketch for the first time, Procreate makes digital drawing on iPad Pro easy to master.
Join famous illustrators around the world as they swap their drawing paper, pencils, markers, brushes, and paint to enjoy the benefits of iPad Pro and Apple Pencil.
Save this story to Pinterest so you can look at it later!

How To Draw Realistic Animals: Embrace New Technology
I’m an illustrator in Toronto who specializes in pet portraits. I’m also a devoted dog dad who is fairly obsessed with his own sweet darling pup. So creating custom dog portraits (and cat portraits too) was an inevitable niche for me.
I’ve been selling custom pet portraits through my Etsy shop, ScheibShack, for a while, which has fortunately led to various other freelance illustration endeavours. However, pet portrait artist is still my main gig. And at this point I’ve really honed some skills I’d love to share.
Historically, I’ve always worked with traditional media – pencil, ink, watercolour, on paper, however, after much curiosity I’ve recently given digital drawing a try. I’ve been blown away by how easy it is to pick it up, and its amazing potential. Creating dog portraits with an Apple Pencil on iPad Pro saves me time, money on art supplies, and is really quite fun. It also saves my neck from craning hunched over a desk for hours. I now get to kick back and draw on the couch with my pup snuggled at my side – and what could be better than that?!
For freelance illustrators who are still unsure…don’t worry, I’m not asking you to replace your traditional art tools. Our Procreate tutorial will show how illustration on iPad Pro offers an exciting new tool to add to your art arsenal.
Join Dobbernationloves founder Andrew Dobson in the kitchen by signing up for a fun virtual cooking class! Classes begin with a cocktail that you can sip while preparing 2-3 recipes that are curated around a unique culinary theme. Check out our current Cooking Class Schedule!
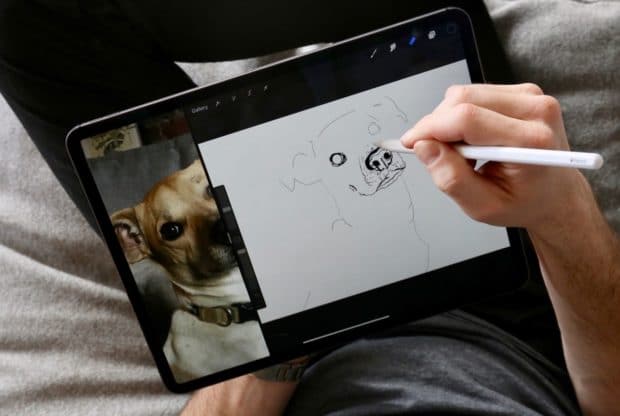
How to Draw Realistic Animals: Illustration Apps
This story offers a step-by-step Procreate tutorial on how to draw realistic animals. It’s important to note there are several other drawing apps you can use on iPad Pro when drawing dog portraits. Here are just a few:
- Notes: The Apple sketch app that comes with your iPad! Simple, easy to use for quick sketches, free and fast. Though for serious drawing you may want to seek apps with more robust options/tools. Price: FREE
- Adobe Illustrator Draw: This app is for creating vector graphics, with a very intuitive interface. It can also sync with Adobe’s Creative Cloud, meaning you can transfer your work between the iPad and desktop no problem. Price: FREE with Creative Cloud subscription, monthly plan prices vary.
- Inspire Pro: Fast and nicely responsive, with a huge variety of customizable tools, and over 80 brushes. Great for beginners and intermediates alike. Price:$13.99 CAD
- Procreate: Easily one of the most popular drawing apps, it works seamlessly with Apple Pencil, is highly responsive and offers an excellent variety of tools, all presented in a terrifically simple interface. Price: $13.99 CAD
If you’re a newbie digital illustrator we also suggest purchasing Beginners Guide to Digital Painting in Procreate, iPad and iPad Pro for Dummies, a protective iPad cover and Apple Pencil Case.
I

How To Draw Realistic Animals: Dog Portraits
So what animal would you like to draw? The special thing about drawing a pet portrait is that you usually have a chance to get to know your subject. Having an understanding of the pet as an individual is a big help when drawing a pet portrait. Even just subconsciously, it will help the dog or cat’s personality to shine through in the finished product. When learning how to draw realistic animals, it’s helpful to have the owner fill you in on what makes their pet unique. Trust me, they love doing that!
It’s even better if you can spend time with the pet itself. A great thing about iPad Pro is that you can take your reference photos with the very device you’ll be drawing on. Just one of many examples of how drawing this way can streamline the process and make the creation of dog portraits more efficient.
There are many famous illustrators and pet portrait artists who specialize in different animals. Dog portraits, cat portraits, horse portraits, and bird portraits are the most popular.
For this step-by-step Procreate tutorial, I’ll show you how to draw realistic animals by creating a dog portrait using my very own pup, Daisy, as my supermodel subject.

Procreate Tutorial: The Benefits of iPad Pro
In this Procreate tutorial I’ll point out a few awesome advantages you can enjoy when drawing dog portraits on iPad Pro.
- The process is very similar to drawing using traditional methods on paper. I was delighted by how intuitive it is. When it came to actually drawing, I didn’t need to re-learn anything.
- Streamlined process. All of your supplies – camera, reference photos, paper, pens, pencils, eraser, pencil sharpener, paint and paint brushes, are all combined into one place – iPad Pro and the Apple Pencil.
- The ability to undo your work when a pen stroke wasn’t quite right. You can also edit certain elements after the fact. Those eyes are a bit too close together, I don’t quite like the colour I used here. All of that can be fixed easily.
- The ability to work in layers, drawing or colouring over or under certain elements without worrying about accidental erasing or colour contamination.
- You aren’t tethered to your desk. You can get comfy and work wherever you like. And that includes outside your own home too.
- Easy transferability/shareability of your art. Your finished product is already in a format that you can add to your illustration portfolio online, share on your social media, etc. No need to arrange a high quality scan or professional photograph.
- The ability to replicate elements, (for patterning, for example) rather than needing to hand-draw the same thing over and over.
If you’re a freelance illustrator looking to up your game, getting familiar with this medium will benefit you tremendously. And if you are an amateur who just loves to draw, looking to have fun creating pet portraits, iPad Pro and Apple Pencil can help you do things you might not have thought possible.
Procreate Tutorial: How To Draw Realistic Animals
Let’s first get set up with a new canvas in Procreate. When you first open the app you’ll be in the “gallery” where all of your artworks will be visible. Tap the “+” in the top right of the screen and a menu will appear where you can select your canvas size. To choose your dimensions click “create custom canvas” and enter them (in mm, cm, inches, or pixels). You can simply select “screen size,” however I recommend going bigger so that you have the option to print your finished piece with a nice resolution. For my dog portrait I’ve created a 22″ x 29″ canvas.
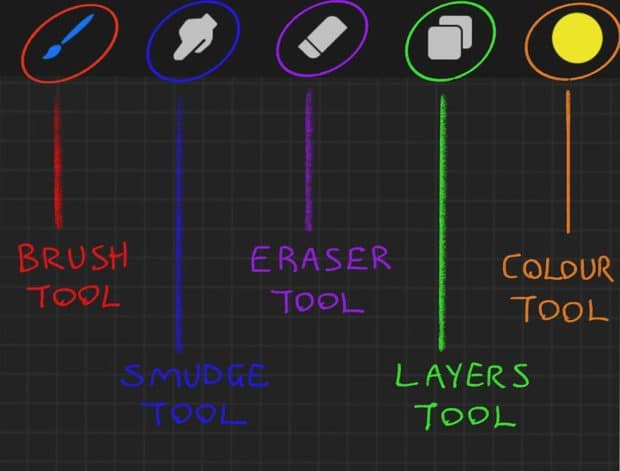
Now it’s important to explore and familiarize yourself with Procreate’s basic tools. Starting with the toolbar on the top right of your canvas.
- The Brush Tool: This is the tool with which you draw/paint. Tap it to open your Brush Library. Procreate’s brushes are categorized in a list down the left side of the drop down menu. Tap any of these to see your brush options in each category. Choose what you like and then tap the brush icon in the toolbar again to close the menu. Now get scribbling! Try a few different brushes and use different pressures and angles of the Apple Pencil – it’s remarkably realistic in its response to your hand.
- The Eraser Tool: It does exactly what you think it does! Tap it and you’ll open an identical Brush Library as tapping the brush tool. Try a few and see how it erases your scribbles.
- The Colour Tool: This is your colour palette. Tap and it will open in its default view of “Disc.” Use the outer wheel to select colour, and the inner circle to select lightness/darkness. When you’ve chosen the colour you want to use, tap the colour icon in the toolbar again to close the menu. Again, do some scribbling! Choose a variety of brush and colour combinations to get a feel for the colouring process.
- The Smudge Tool: This is used to blend colours and create gradients. This tool has the same effect as taking your finger to pencil on paper and rubbing it to blend. The smudge tool mimics the real thing fairly well but it does take some getting used to.
- The Layers Tool: You can use this menu to create multiple layers on your canvas, and select between them. How to do this, and the benefits of layers, will be best understood by following through my own example here in this Procreate tutorial.

Then there are the slider toolbars on the left side of your canvas.
- Brush Size: The top slider. Tap, hold and move up and down to adjust the size of your brush tip. A preview window will open up to help guide you. This slider is used for your brush, smudge and eraser tools in the same way.
- Brush Opacity: The bottom slider. This works the same way as the brush size slider, but is for brush opacity.
- Undo/Redo: Under the sliders you’ll see these two buttons. Tapping the undo button will undo the last stroke you drew/erased. Vice versa with the redo button. This is a very useful tool you’ll probably use a lot. You can also undo by tapping once anywhere on your canvas with two fingers.
There is also the toolbar in the top left of your canvas. For these tools I will point them out and explain them along the way as we need them.

How To Draw Realistic Animals Step 1: Choosing a Reference Photo
If you have the opportunity to meet your dog portrait subject in person, take your reference photo with the camera on iPad Pro. If you’re drawing a dog that lives on the other side of the world, you’ll need the owner to send a good quality image that is clear and in-focus. The best dog portraits I find are created by using a good close up photo of its face. A doggie headshot, if you will.
As I mentioned though, representing personality is important when considering how to draw realistic animals. So if you are rendering an especially rambunctious pup, perhaps a fun action shot would be the way to go, so long as it still features a dog’s face well.
How To Draw Realistic Animals Step 2: Quick Sketch Setup
The next step is a quick sketch of your dog. It will act as a “rough copy” that you can draw a “good copy” over top of and take more time with. A helpful way to do this is to draw a rough trace of your reference photo.
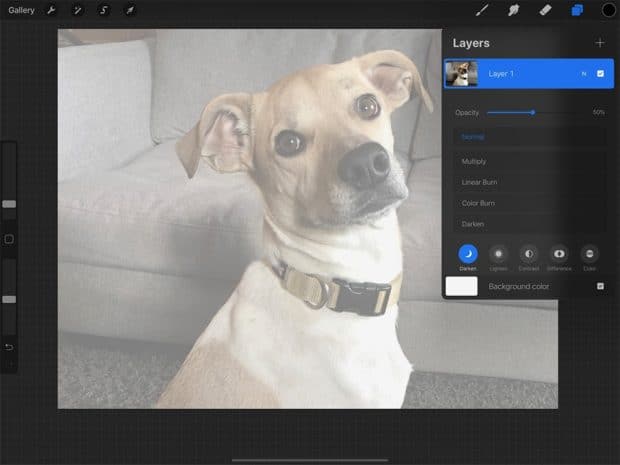
Starting with your blank canvas, click the “action” icon (the little wrench in the top left toolbar) > add >insert a photo. Choose your reference photo and Procreate will drop it onto your canvas. You can adjust the size using the bounding box guides and then tap the “select” icon (the little cursor in the top left toolbar) to set the photo in place.
One of the great Procreate drawing functions is that freelance illustrators can utilize layers, which we’ll use now.
Tap the “layers” icon in the top right toolbar to open the layers menu. Your photo layer will be highlighted. Tap the “N” and an opacity slider will open. Drag the slider down to around 50%. This will make drawing overtop of it easier to see. Next, create a new layer by tapping the “+”. This will be your quick sketch layer. Tap the two squares again to close the layers menu.
For this portion I like using the “technical pen” brush under “inking” in the brush menu, mostly because I like how the brush responds to different amounts of pressure. Basically, if I push harder the line gets thicker, and vice versa. So cool!
With more practice you’ll find the brushes you like best, it’s just a matter of preference.

How To Draw Realistic Animals Step 3: Drawing Setup
Do a quick, rough trace of the main features of your dog portrait (eyes, nose, where the ears start and finish, etc.) You don’t need to take your time here, this is just a convenient way to get your proportions more or less correct.
Once you have your rough sketch, create a new layer again in the layers menu. This will be the “good copy” layer that you draw overtop of your reference sketch. Before you start, select your rough sketch layer again by tapping it, and in the same way you reduced the opacity of the photo layer, bring the opacity of the rough layer down to about 30%. At this point you can also delete your photo layer. Do so by swiping that layer in the menu to the left. A delete button will appear.
The last thing to do before you get to drawing, is setting up your reference photo to work from. A great option with iPad Pro is that you can keep your photo open in a window beside your Procreate canvas while you work. To do so, tap and hold the bar at the bottom centre of the screen in Procreate, then slowly pull up the iPad menu (if you swipe too quickly you’ll close Procreate). Once the menu’s up, tap and hold the photos icon, and drag it to the left side of the screen (or right side, for the lefties out there!) Pull it past the edge of the Procreate window and drop it there and voila, you have both open at the same time.
And now you can start drawing!
How To Draw Realistic Animals Step 4: Outlines
The fun part! This is where you can take your time and really get lost in the drawing process. Importantly, make sure you have selected your “good copy” layer in the layers menu. Then, using your rough copy proportions guide and your reference photo, draw your outlines. I like to do all of my outlines in black, but that’s up to you. For this layer don’t worry about any shading or colour, those will be done on another layer.
Remember if ever you want to undo a stroke, just tap the screen once with two fingers. You can go back as many strokes as you like this way, Procreate remembers everything!

Useful Tips For Creating Outlines With Dog Portraits
- Keep in mind your line thickness. Your drawing will look better if you use a variety of thicknesses. Take a look at my sketch layer to get a sense of that photo. Smaller details get a lighter touch, and my outer lines are a lot heavier. You can achieve this by how hard you press with Apple Pencil. You can also quickly and easily adjust your brush size using the slider on the menu on the left side of the screen.
- You can zoom in and out by “pinching” the screen with two fingers. Don’t forget you can zoom in for areas with small details, like the small whiskers around your dog’s nose and mouth. You can also rotate the canvas using a two-finger pinch, rather than turning the iPad itself around. It’s an inevitable habit when you’re used to turning your piece of paper around – iPad Pro offers an easier way!
- If you want to draw a perfectly straight line, hold the Apple Pencil down in place after drawing a line, and the line will snap to a perfectly straight one between your starting and end point. You can do this for drawing circles too – it’s great!
How To Draw Realistic Animals Step 5: Shading and Colouring
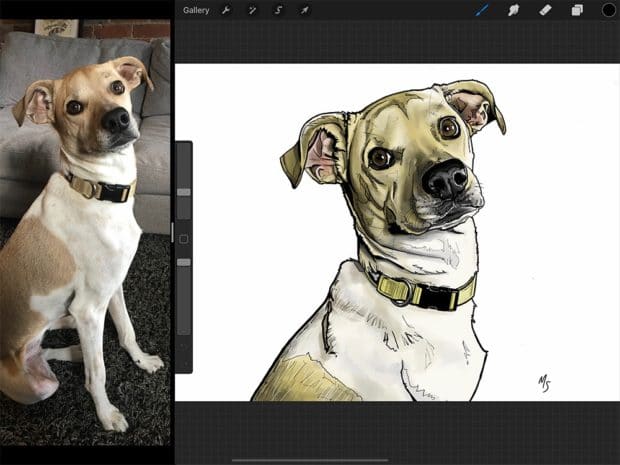
Now you’ve created a lovely outline drawing of your dog portrait. Time to colour her in.
Again, this is where layers come in very handy. Go to your layers menu and first, delete your rough copy layer. Next create another new layer by tapping the “+”. This time though, tap and hold your newly created layer and drag it down so that it is underneath your outline layer. By placing it here, it means you can colour in without accidentally colouring over your outlines – amazing!
Now you can get to painting. Procreate has a dizzying variety of brushes, and feel free to experiment with what effects you like for your dog portrait. For my dog portrait I am starting with the simple round brush under “painting.”
Useful Tips For Shading and Colouring Dog Portraits
Just like when painting with real paint on a canvas, it’s helpful to start with a base layer of colour (sometimes called an underpainting). Get your dog portrait filled in so that there’s no white left within the lines. After that it’s a matter of layering colours on top to create dimension. Pay attention to the subtle changes in colour on the dog’s fur and adjust your colour on the colour wheel accordingly.
A great tip is to save your base layer colour so that you can return to it and lighten/darken from it as you need. To do so, in the colours menu, just tap in the area under “test” and a swatch of the colour you have selected will save there.
Another general tip for how to draw realistic animals is don’t be afraid to go for bold contrast between light and dark areas. The more contrast there is the more dynamic and 3-dimensional your dog portrait will appear.
Rather than getting hung up on the fine details of fur, you can give the suggestion of texture by using different brushes. When it gets to the point of top layer details for my portrait here, I’ve been using the “gouache” brush under “artistic.”
For areas that are a starkly different in colour from the main body of your dog (think eyes and nose) you may want to do those on a separate layer under the outline layer too. This just prevents accidental colour blending with the surrounding fur.
Congrats, You’ve Completed Our Procreate Tutorial!
You’ve now mastered how to draw realistic animals!
If you’re an artist who draws or paints a lot, you know it’s possible to keep going and going and tweaking and tweaking into eternity. And truthfully Procreate makes falling into this even easier. The up side, however, is that you can leave your dog portraits alone for a time, and then very easily pick up where you left off, without having to get all of your paints out.
All that said, you will know when it’s done, and for a satisfying finish to your digital drawing experience, you can utilize one of my favourite Procreate features – timelapse video. By default, Procreate records your entire drawing process (you can opt to turn this off, but really why?) You can play it all back in high speed when your drawing is complete. It’s such a fun thing to watch and a fun thing to share with curious fans of your art. If you’re a freelance illustrator, you may realize offering a timelapse video of your clients work acts as a competitive advantage. And better yet, offering a video that showcases the creation of your dog portraits requires no additional time or money.
By using this Procreate tutorial as your step-by-step digital drawing guide for how to draw realistic animals, I’m sure you will be very satisfied with your result. Once you’ve gone through the motions from start to finish you can experiment and settle into your own process. iPad Pro and Apple Pencil offer so many possibilities that you can really let your creativity run wild.
For me drawing on iPad Pro feels like playing with a new toy. It makes something I already love even more enjoyable. So dive into digital, try it out and have fun!
Story by Mark Scheibmayr
You May Also Enjoy Reading…


Thank you! This will help me very much!
Have fun improving your drawing skills!
Thanks so much; a great tutorial. I’m going to have a go now.
Enjoy!
Thank you fit this, my new iPad arrives tomorrow so can’t wait to give digital drawing a try.
Let us know how it goes. We have a series of iPad illustration stories so click through the website to find more inspirations!